Creating QC Ticket for Product Complaint
| 3 minutesHelpdesk module is used to record and track any quality complaints from Customers. Helpdesk module allows to connect Customer with the product that has quality defect, Sales Order it came from, and coordinate with Procurement Dept. on finding the solution.
This SOP will explain what a QC Ticket is, how to use it and how to create it.
Getting started with QC Ticket
After Customer complaint is received, Salesperson will create a QC Ticket, fill out the information, and assign it to the Procurement Dept. Procurement Dept. will assess the complaint, check the information, and communicate with the Vendor to resolve the issue.
- QC Ticket is the main document used to handle quality issues with products.
- QC Ticket displays the defected products, product specifications and affected quantities.
- QC Tickets can be viewed from any contact page (Customer or Vendor) to see previous or current quality issues and rank the Vendor.
- QC Ticket is used to record the details of the quality issue, track the progress of each complaint and record the solution for future reference.
QC Ticket Stages
- New: Initial stage at which Tickets are created. This stage is used by Salesperson to fill out the details of the complaint.
- In Progress: Salesperson will move Tickets to this stage after the Complaint of Product Quality Form has been received from the Customer and Salesperson has collected enough data for the Ticket is ready to be passed to Procurement Dept.
- Solved: Salesperson will move Tickets to this stage after they are resolved from both Sales and Procurement side.
- Canceled: Salesperson will move Tickets to this stage when document is not required anymore (e.g Ticket was created by mistake, etc.).
QC Ticket Types
- Product: Any quality complaint or question related to the product, product quality, product specification, etc. This Ticket Type allows user to choose the products from related Sales Order and set the defected quantity, record the dates of each step of the process, and record the final solution from Customer and Vendor side.
- Internal: Any quality complaint, issue or question not related to any specific product (can be related to Vendor in general, Vendor range, Vendor production time, etc.).
- Billing: Tickets related to billing issues and are not attributed to any Products.
How to create a Ticket
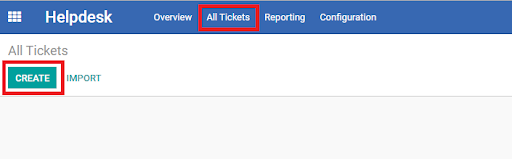
- Locate Helpdesk Module.

- Choose ‘All Tickets’ in the top menu and click ‘CREATE’.
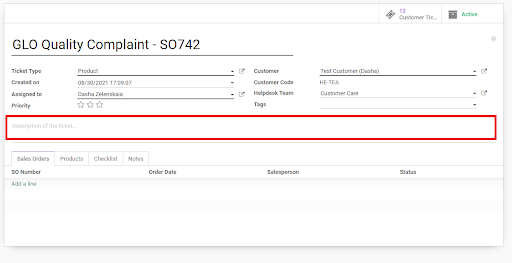
- In the form view of the new Ticket, fill out the following fields:
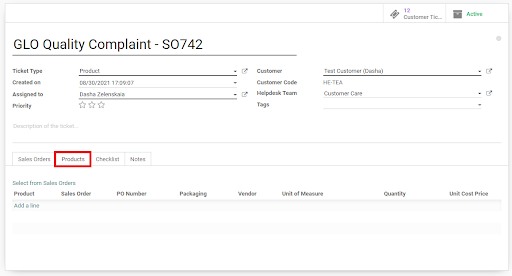
a) Ticket name (‘Subject’ field). Ticket name has to follow the format: ‘XXX Quality Complaint – SOXXX’, for example: GLO Quality Complaint – SO742
b) ‘Ticket Type’ field: ‘Product’, ‘Internal’, or ‘Billing’.
Note: ‘Product’ Ticket Type is the most common and allows Salesperson to connect the Ticket with products from a certain SO.
c) ‘Customer’ field.
Note: Make sure to choose the correct Company name from the dropdown, otherwise the System will not show the correct number of SOs and will not connect the ticket to the right Customer.
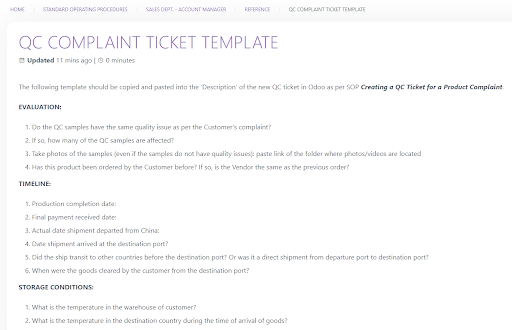
d) ‘Assigned to’ field: All tickets at this stage should be assigned to Procurement Dept. Manager. - See the “QC Complaint Ticket Template” in the Reference section of support.advacarepharma.com.
- Copy and paste the content in the ‘Description’ to the new QC ticket: EVALUATION, TIMELINE, STORAGE CONDITIONS.
- Complete the description of the ticket.
* DO NOT ADD ANY CUSTOMER/COMPANY INFORMATION IN QC TICKET, ONLY CUSTOMER CODE.
- Add SO related to the quality complaint: click ‘Add a line’ in ‘Sales Orders’ tab, choose one or several SOs from the list and click ‘SELECT’.
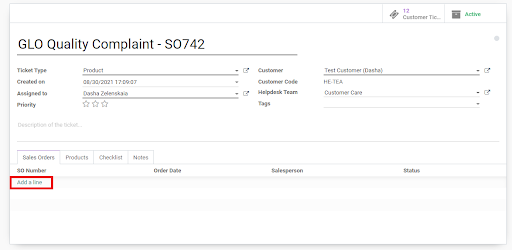
- To add the products to the Ticket, switch to the ‘Products’ tab.
- Click ‘Select from Sales Order’ and search by relevant SO number (or multiple SOs) by entering it in Search field.
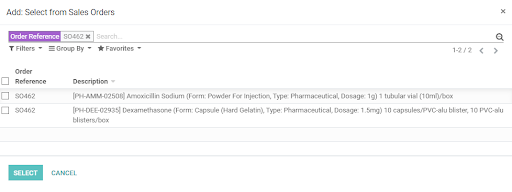
- Choose one or several products and click ‘SELECT’.
- When a product is added, adjust the quantity if necessary to reflect the defected quantity.
- Click ‘SAVE’ on top of the screen to save the ticket.
- Send a task in Chatter on the right to Sales Manager and Purchasing Manager to inform of the created Ticket and the path link of where the AdvaCare Complaint of Product Quality Form is saved.