Creating OPP
To start attending any new sales inquiry, Salesperson needs to create the following documents in the System:
• Opportunity;
• Quotation;
• Purchase Agreement;
• Project;
• Task.
Additionally, Salesperson needs to create a shared folder in AdvaCare Cloud Server to save all the files related to the inquiry (pdf, doc, excel, etc.).
This SOP will list the steps of how to create an OPP in the System.
Getting started with an OPP (Opportunity)
Using our existing sales/marketing contact channels (e.g. websites, social networks, etc.) a potential customer can reach AdvaCare to make an inquiry. After the inquiry is received, processed and passed over to Sales Department, Salesperson needs to generate an OPP in the system, which will be used for all further communication with the customer. * Opportunity is the main document used for all communication with a customer. * Opportunity is the document where Salesperson records all the information about the initial inquiry. * Opportunity is used to generate all other RFQ/ORDER/REGISTRATION related documents.
OPP Stages
OPPs of Account Managers have 4 main stages that reflect the process of communicating with a client, from initial contact and starting an order to completing an order. Stages have different buttons and different features. You can see all the OPPs divided by stages in Pipeline, which is the main view of the CRM module.
•
Evaluation: After Customer replies to any Lead Reply, Business Development Sales Team will move OPP into this stage. Account Manager Sales Team can move every Existing Client OPP directly into this stage. This stage is used to discuss with Customer details of the future Order/Registration - products, terms, documents required, etc. At this stage, Sales Team needs to fill out ‘Destination Country’, and use ‘Awaiting Response’ feature to be able to organize the workload. At this stage, Sales Team will also send Survey, create Quotation and Project.
•
Proposition: After Quotation is sent to Customer, Sales Team will move OPP into this stage.
•
Negotiation: This stage is used for negotiation of prices given to Customer in Quotation.
•
Won: Sales Team will move OPP into this stage after sales order is confirmed and down payment is received.
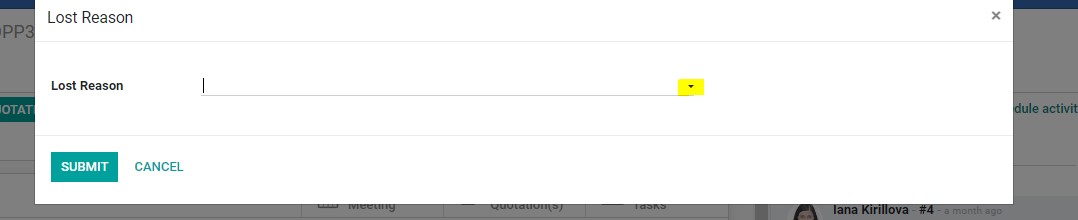
If OPP needs to be archived (the inquiry did not materialize into quotation/order), then the OPP needs to be marked as “LOST” by clicking the button on OPP page:

When marking the OPP lost, select the reason from the drop down for future reference:
How to create an OPP
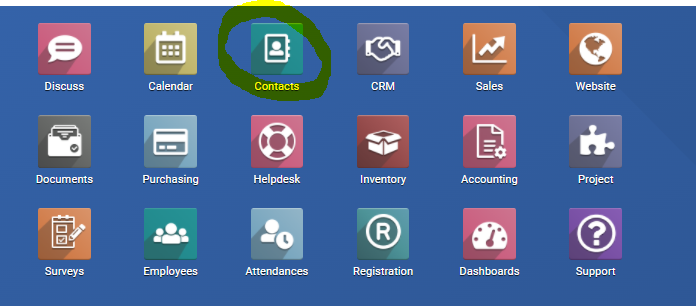
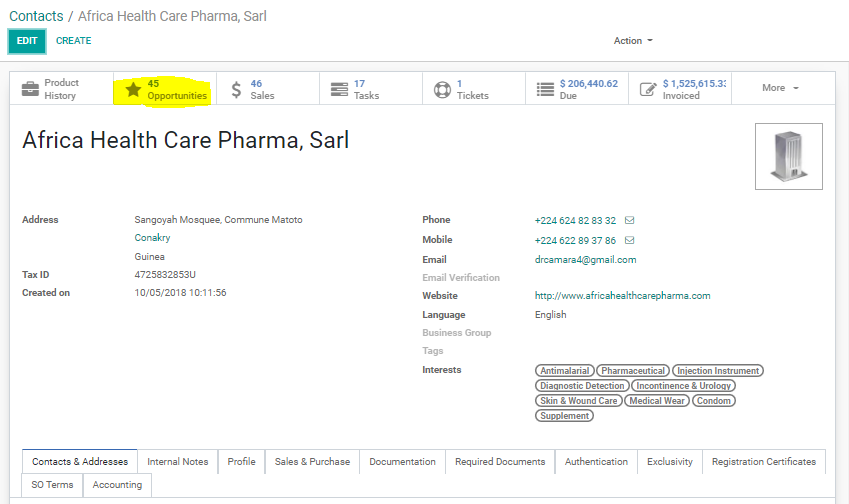
1. From the Home page, go to the Contacts Module.
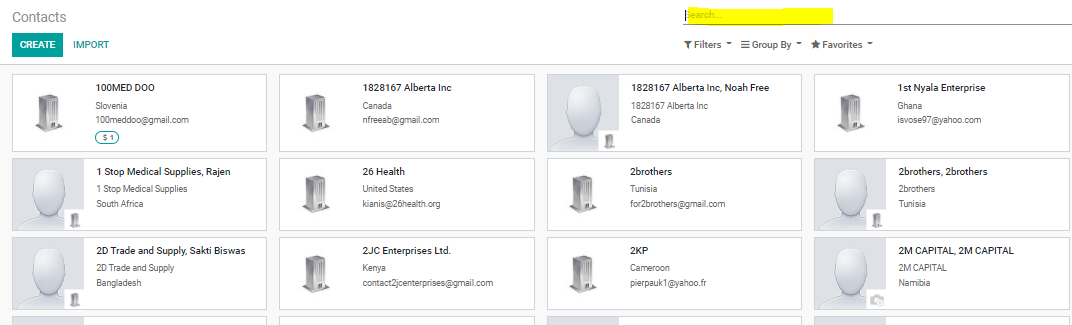
2. In the search bar, search the customer by the “Internal Customer Code” (REF: “AFR”, filter: Search by customer) and it will open the Customer page.
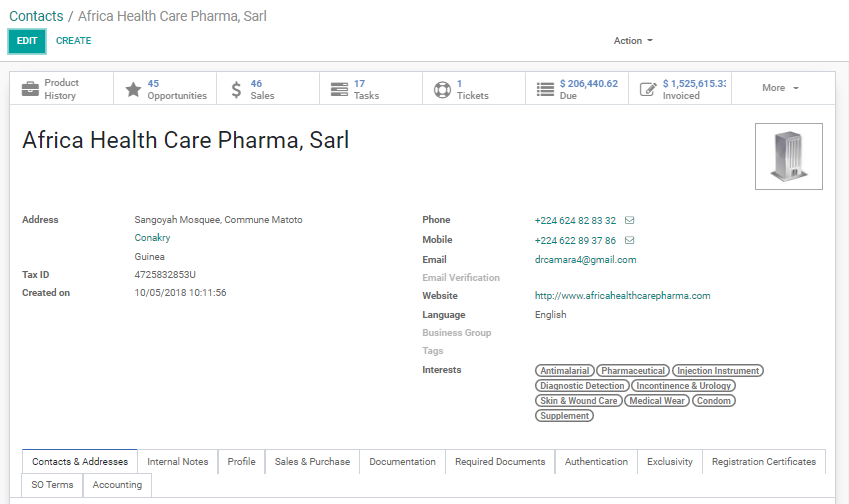
3. Click on “Opportunities”
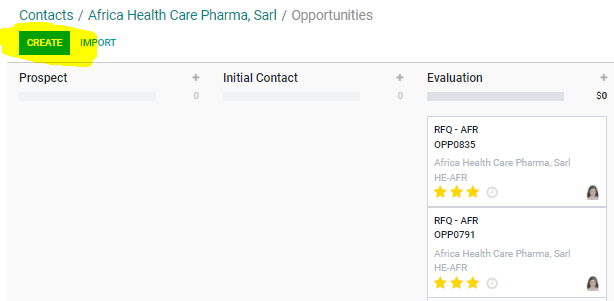
It will open a new window where the Salesperson needs to fill out the name “RFQ – XXX” (Where “XXX is a Customer Code that you already used to search the client) and click “Edit”.
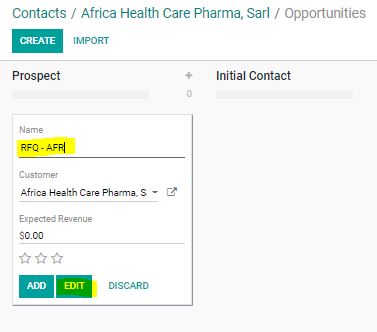
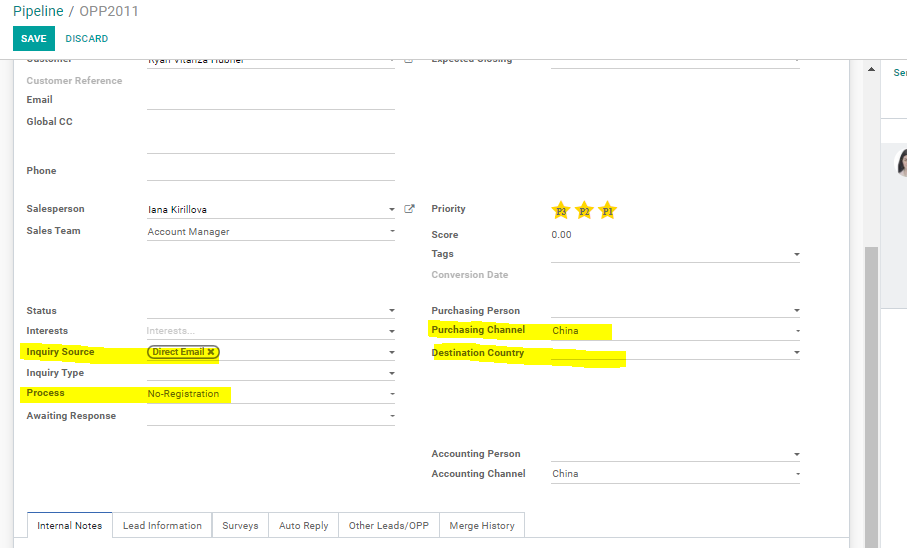
It will automatically open an opportunity (OPP) on the “PROSPECT” stage. Now Salesperson needs to:
• Check if Sales Person is correct and belongs to correct Department
• Add a tag to “Inquiry Source” as “Direct Email”
• Set Priority “P1”

5. After the above is done, on the same page, move the OPP stage from “PROSPECT” to “EVALUATION”
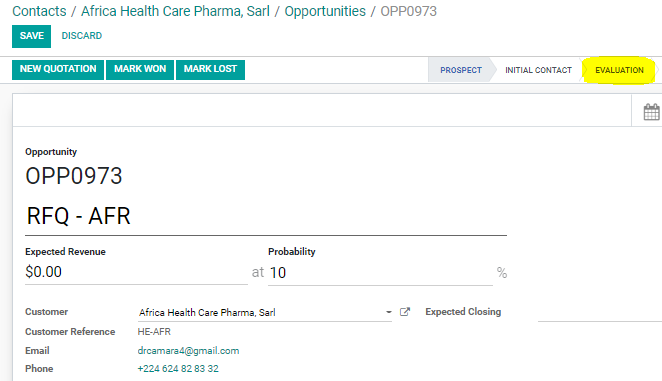
It will automatically open a new page for this OPP, where Salesperson needs to:
● Add “Process” (No registration or Registration)
● Choose “Purchasing Channel” (China or India)
● Choose “Destination Country” (The country where the goods will be shipped to the Customer)
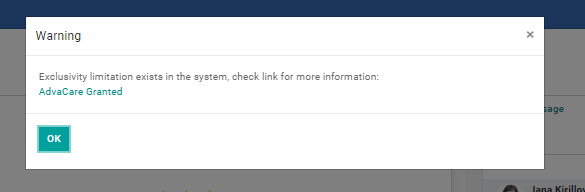
Note: if any Customer at AdvaCare has been granted exclusivity terms, and the current RFQ being created for a prospect has the same Destination Country, the relevant notification will appear. Depending on the type of the exclusivity terms, Salesperson may continue with the RFQ for the current prospect. The goal is to make sure the exclusivity terms are not breached.
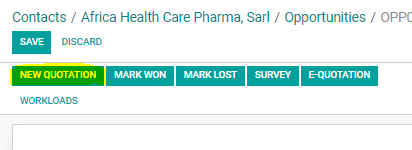
6. After all of the above is done, click on “NEW QUOTATION”
Now, OPP has been connected with the “Sales Quotation” where Salesperson will be working on the Customer’s inquiry for the products.
Creating SO
To manage products the Customer is interested in and provide prices, Salesperson needs to create the following documents in the System:
• Quotation (SO);
• Purchase Agreement (PA).
This SOP will list the steps of how to create an SO and PA in the System.
SO Stages
SOs have 4 main stages that reflect the status of the sales process with a customer, from initial quotation to completing an order. Stages have different buttons and different features. Stages are visible after accessing a specific SO.
• Quotation: Initial stage at which SOs are created after Sales Dept. generates a Quotation document directly from the Opportunity section.
• Quotation Sent: Stage that appears after Quotation is sent to the Customer via 'SEND BY EMAIL' button.
Note: if Salesperson sends Quotation by a different way (e.g composing an email and attaching a document via Gmail, etc.), the Quotation Sent stage is not required anymore and will not appear.
• Sales Order: After Customer accepts and confirms the quotation (with final products, quantities and prices), Salesperson will move SO into this stage. Sales Order stage is the final and most important stage. Sales Order stage allows Salesperson to generate Invoice and Sales Contract, unavailable in other stages. When SO is moved to this stage products, quantities and prices become uneditable.
In addition, there is an invisible SO stage, which only appears when a SO has been canceled for any reason.
• Cancelled: Salesperson will move SO into this stage when document is not required anymore (e.g Customer cancels the order, SO was created by mistake, etc).
This document is mainly oriented to explain how to create a new SO and add products and quantities. In future documentation, Sales Order will be explained in more details.
How to create an SO
In the Quotation page, Salesperson has to check all information that was automatically added by system:

- Customer information;
- RFQ Date (fills automatically, do not change the date)
- Validity (unti what date the provided prices will be valid for the customer. Salesperson is to choose the date by checking with Purchasing and Sales Manager)
- Confirmation date (the date when the order was confirmed and moved to SALES ORDER stage)
- Payment Terms (normally filled in automatically from the customer contact card. If empty, inform the Sales Manager to fix that with the Accounting Department. Salesperson is allowed to manually update the payment terms only for the orders with the total value below $10,000 to 100% down payment to start production)
- Exchange Rate Date (initially empty field. Salesperson is to select the date from which the exchange rate will be pulled and shown below as Order Exchange Rate
Note: If the customer’s inquiry is coming from OSP Project (Orders Started Production), Salesperson needs to add a label “OSP” by clicking on the button:
Now you Salesperson gets started with adding the inquired products in the SO Table:

Salesperson must edit the following fields in the SO line:
a) Product field;
a.1 Click on Search More option.
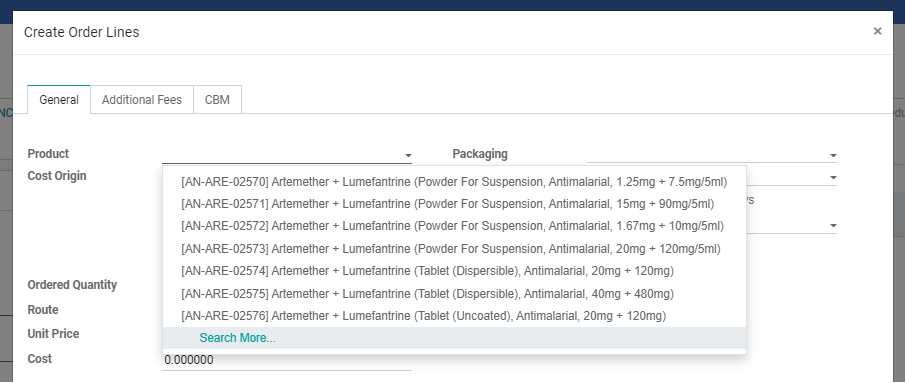
a.2 Write an attribute value and click on Search Product Attribute + for option.
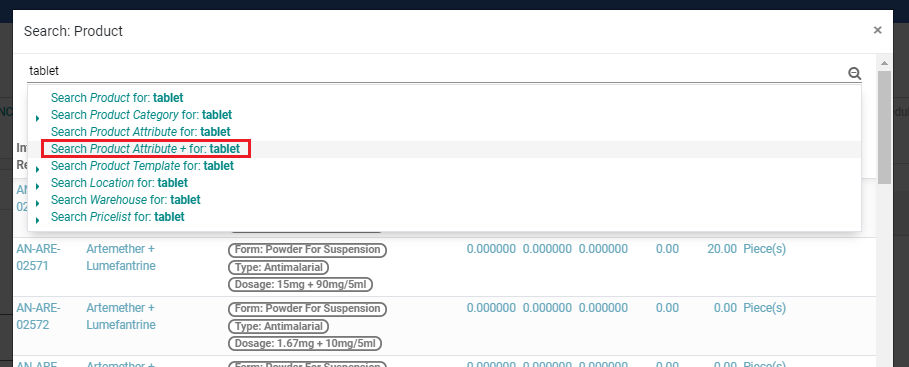
Note: To search for more attribute values, repeat the step a.2. Searching for multiple attribute values will have an appearance like this (see below).
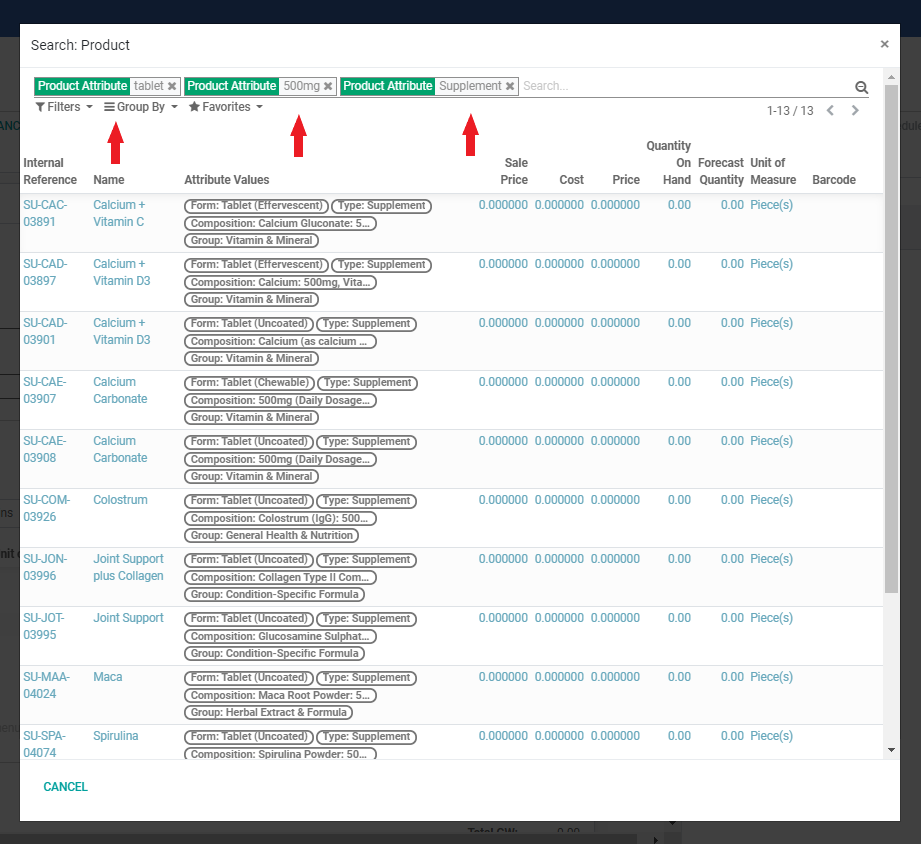
a.3 Select a product from the search results table.
b) Packaging field;
c) Ordered Quantity field;
d) Ordered Quantity field; Packaging Requirements field in the bottom of the product pop up. Here the Salesperson needs to fill out any special packaging requirements that might influence the price. Purchasing Dept. will see this information and pass it to Vendors.
e) Packaging Requirements field (If the product was ordered before (check Excel file “ALL PRODUCTS ORDERED” in the relevant to Customer Distributor folder in the server), you can find the packaging requirements in “ORDER PACKAGING DETAILS” for the product in the server (Go to “AdvaCare Design Control” and search by type (Ref: Pharmaceutical/Supplements/etc.”) -> form (Ref: Tablets/Capsules/etc) -> Product’s name -> Customer Code-> Order Number). If the product is being ordered for the first time, fill the field for packaging requirements as much as known from the Customer). It's preferable to do this process before a Purchase Agreement PA is created. This process to add packaging requirements is described in
PACKAGING REQUIREMENTS IN SO.
Note:
The more information Salesperson can fill out in the SO line the better. If applicable, fill out 'Remarks' to help Purchasing Dept. have accurate information of the added products.
When adding products to an RFQ, the product does show up in the 'Product" field. If salesperson cannot find the product, this can mean:
- Product name has been not been searched correctly (customer may have given a different name)
- Product has never been quoted before
For either of the above, Salesperson informs Sales Manager. In case it is confirmed that the product is new, follow the
Reference Research of the new product
.
7. Click ‘SAVE & CLOSE’.
Note:
To add more products and fill their information, repeat the steps above.
8. Click ‘SAVE’.
If the origin of the goods and delivery is not China (for example, India), Salesperson is to revise “Shipping Information” in “Other Information” in SO.
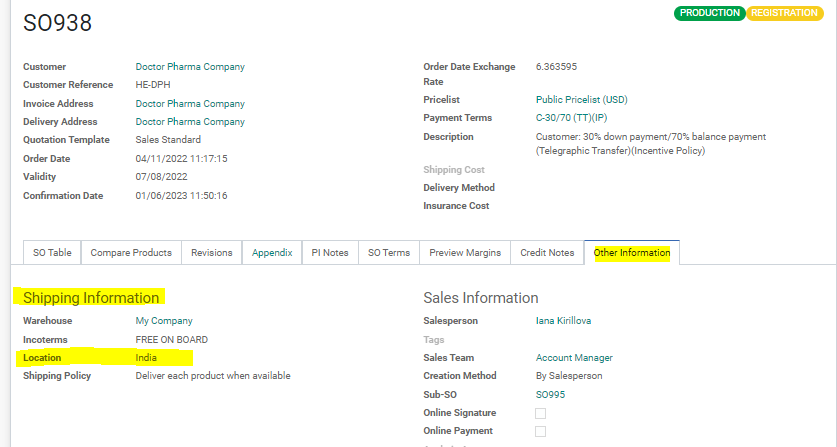
After editing the “Location”, all Accounting Invoices will have the corresponding Origin of the goods and Incoterms. If not changed, Odoo will automatically have “China” in the relevant fields:

Getting started with PA (Purchase Agreement)
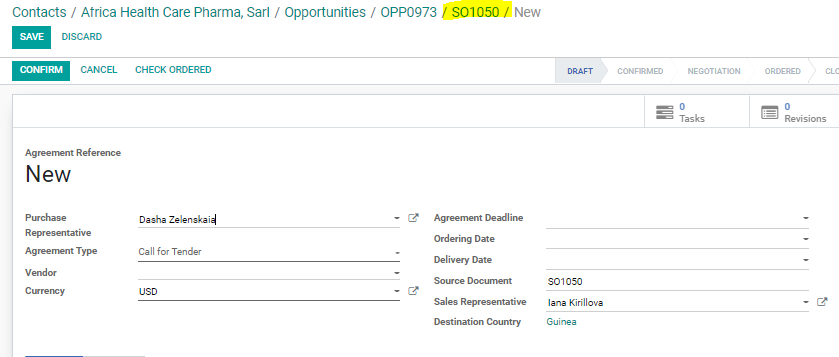
After SO is created, the Salesperson needs to generate a PA. PA is the document used to pass information from SO to the Purchasing Dept. Purchasing Dept. does not have access to Sales Order, therefore Salesperson is responsible to pass the information over to Purchasing Dept.
• Purchase Agreement is the main document used to pass information about products' specifications and quantities to the Purchasing Dept. It should be constantly updated with the most recent information in case of any changes in product specifications, packaging requirements or quantities.
• Purchase Agreement displays the list of products needed for a specific inquiry or order.
• Purchase Agreement is used to generate all other RFQ related documents - POs, which are used to quote prices.
Note: Salesperson is responsible to create PA and keep it updated so that Purchasing Dept. has the most recent and correct information about the inquiry or order.
How to create a PA
1. Locate the relevant SO in the Sales module.
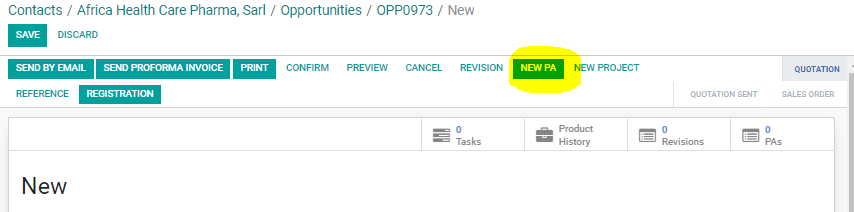
2. Click ‘NEW PA’ on top right of the screen.
It will automatically open a window of draft PA which is mostly related to Purchasing Dept. You only need to click “SAVE” to save the generated draft.

Now, click to SOXXX to go back to the SO Table
Creating a Project / Task
To be able to communicate internally with other departments in the company, Salesperson needs to create a Project and a Task. OPP can have one SO, one PA, one Project and one main Task.
• Project is a parent element of a Task.
• Main Task of an RFQ/ORDER/REGISTRATION is used for internal communication between departments.
• Tasks can have sub-tasks related to different stages or steps of an order.
• OPP, SO, PA, Project and Task are connected and interlinked.
Managing a Project
Project module allows to maintain and manage all projects in the company. Project module functionality allows to set deadlines, make forecasts and timesheets, save documents and track any kind of activity in the company. Projects are important for the Sales Department as they allow to create tasks and manage every inquiry, order and registration.
• Projects can be related to any department.
• Sales Business Projects are created for every potential Order/Registration.
• Projects are used to generate Tasks.
• Projects can be used to set deadlines, make forecasts and timesheets, and save documents.
Sales Project States
Projects have 3 main states that reflect the status of the Project progress, from RFQ as the first state a Project can enter a REG (registration state) or ORD (order state). The Salesperson can find all the Projects defined by a list of states, which is set in 'Opportunity info' tab of each Project in the Project module.
Task Stages
Task under any Project has stages. Stages can be created inside a Project, and will be shown on the top right side of the Task page. To move the task from one stage to another, User needs to click on the relevant Stage, or drag and drop the Task card in Kanban view of the Project. Stages of a Project are universal for all Users, and for all Tasks under one project.
Sales Business Projects have 3 pre-set Stages:
•
To Do: Initial stage for every new inquiry/RFQ.
•
Ongoing: Stage used for confirmed orders. Salesperson should move the task into this stage after down payment is received.
•
Completed: Stage used for closed orders.
How to create a Project/Task
1. Locate the relevant SO in the Sales module, click the ‘NEW PROJECT’ button on top of the SO page.
2. Click ‘EDIT’.
3. Set Priority of a task by clicking on one of the stars next to the task name (3 stars - Priority 1, 1 star - Priority 3). Priority of a task indicates the importance and urgency of an RFQ for other departments, and helps them to organize their workload.
4. Make sure the task name is correct and follows the format:
SOXXX - RFQ/ORDER/REGISTRATION - CUSTOMER CODE - Country (Salesperson Name)
Example: SO001 - RFQ - ABC - Angola (Nicola Di Santantonio)
Note: Salesperson must follow the exact format above, including punctuation (spaces, parenthesis, lower or upper case, etc.).
5. Change ‘Assigned to’ to Purchasing Dept. Manager.
6. Add tags ‘Sales Dept.’ and ‘RFQ’/’ORDER’/’REGISTRATION’ depending on the stage of the order.
1. Write task description in Description task.
The Description should include the following information:
- - New products/reordered
- - Registered/Not Registered (include registered vendor)
- - Vendor name/information required on the packaging/not required
- - If reorder, include the last order number and the vendor
- - Request CBM file
- - Can be quoted only with registered factory or prices from different vendors are needed
- - Currency for Quotation: RMB or USD (if it is an LCL Shipment: need RMB prices unless we are 100% sure that we will be shipping the order. If the Sales Contract is with AdvaCare USA (like FMC) then only USD prices can be used, If it is an FCL shipment, we can accept USD or RMB prices).
- - Any specific requirements (documents, notarization, legalization)
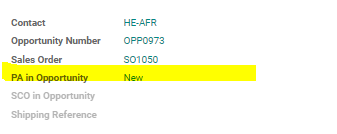
• Add PA in Opportunity ‘NEW’ in Opportunity Info tab.
• Add “Registration Country” in the Opportunity Info tab.
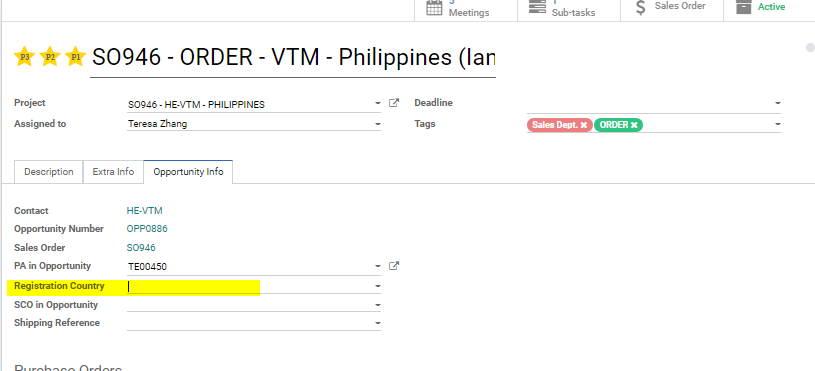
Note: Salesperson must add the registration country only if at least 1 product in the quotation is registered. If the products are not registered and do not require registration, this field remains inactive).
• Add milestone ‘1. Communication Initiated with Customer’ in Opportunity Info tab.
Refer to ‘
How to Fill Out Order Milestones
’ SOP link
10. Click ‘SAVE’.
11. Add followers to the task. There are 2 ways to add followers:
Method # 1: Click ‘Send Message’ in Chatter and use @ to address all people that need to be the followers of the task.
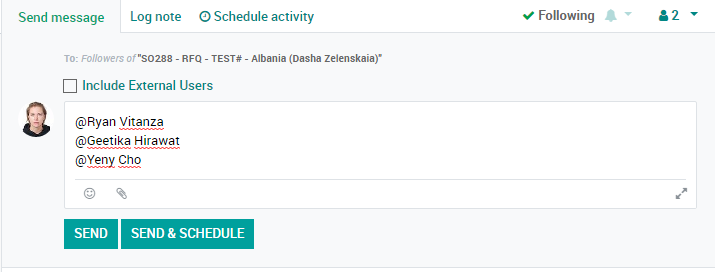
Click ‘SEND’. Followers should be added automatically, double check to make sure that they were added.
Fixing a Project Name
How to edit a Project name
Project name might be wrong for the following reasons:
• if 'Destination Country' is not filled in OPP (in this case Project name will have ‘XXX’ instead of the country name).
• Project name will show ‘XXX’ instead of Client Code).
Salesperson needs to take the following steps to edit the Project name:
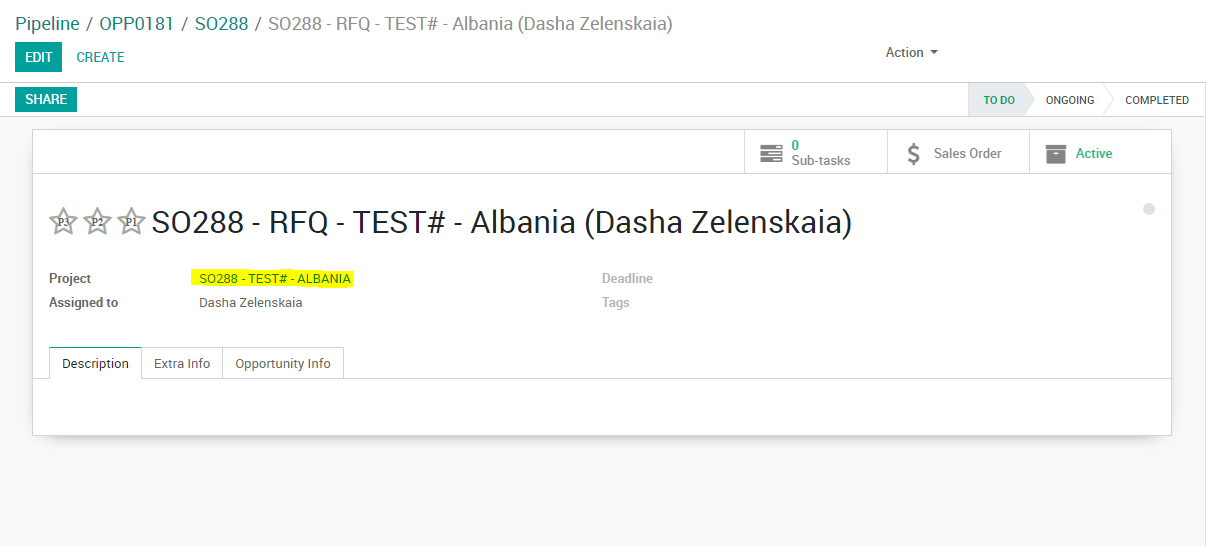
1. Click on Project link in saved mode:
OR click on External Link icon next to Project name in editing mode:
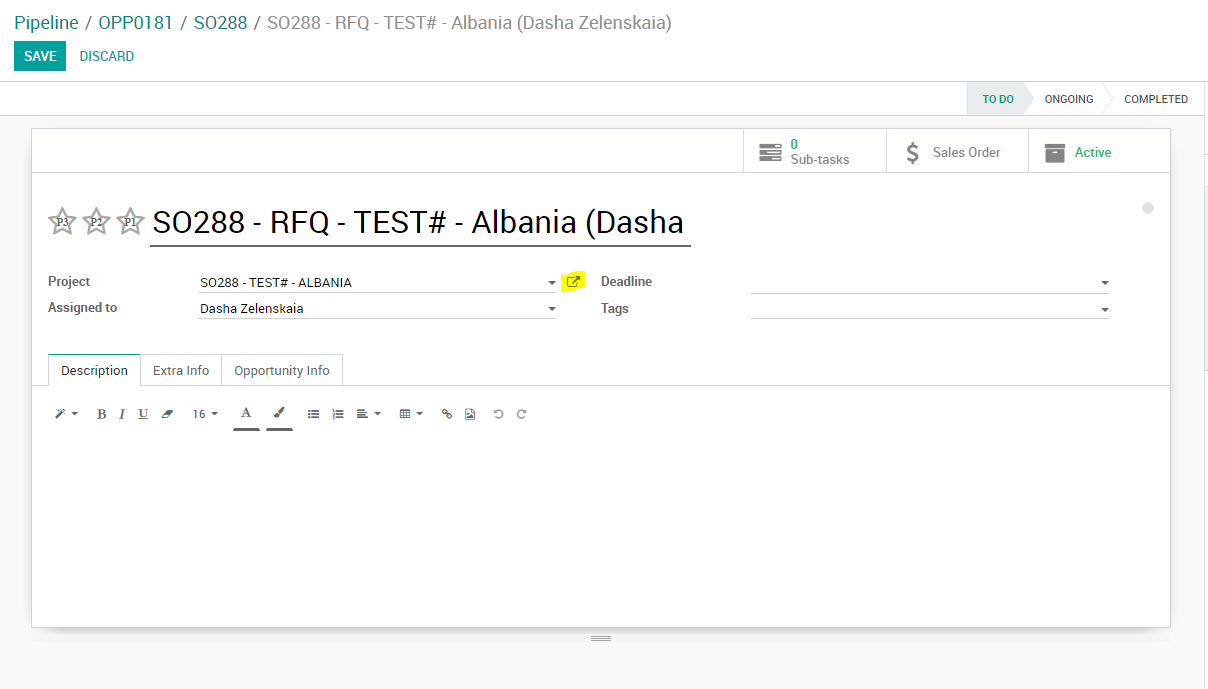
Note: In editing mode, NEVER change the Project name directly in the ‘Project’ line, it will create a NEW project not connected to OPP and SO.
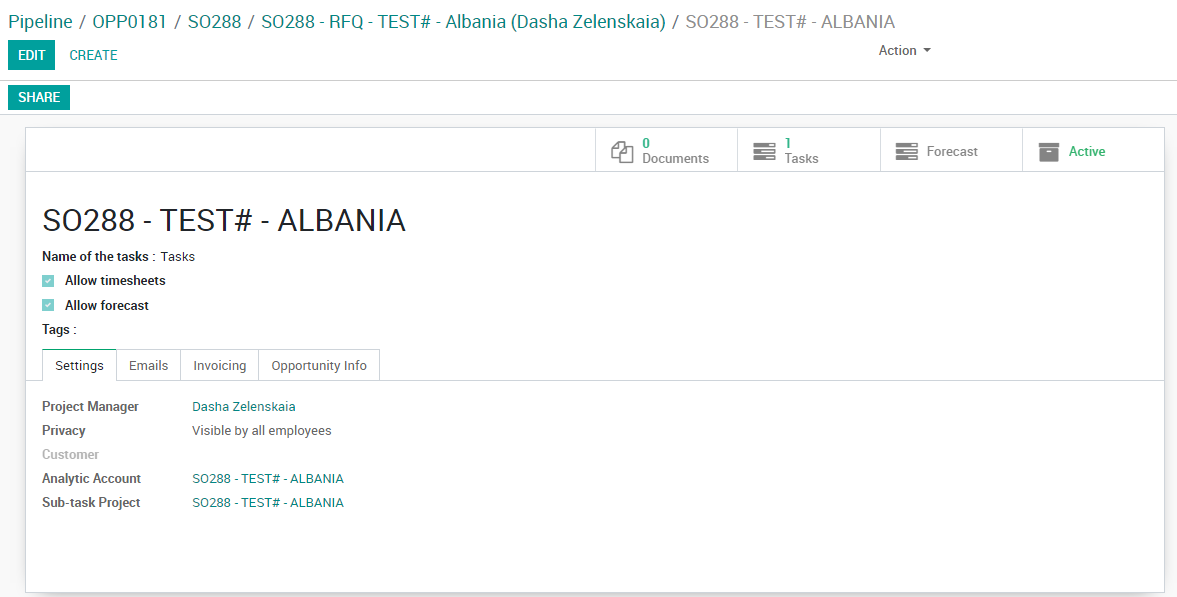
2. Edit the Project name to follow the format:
SO000 - HE-XXX - COUNTRY
Example: SO288 - HE-AAR - PHILIPPINES
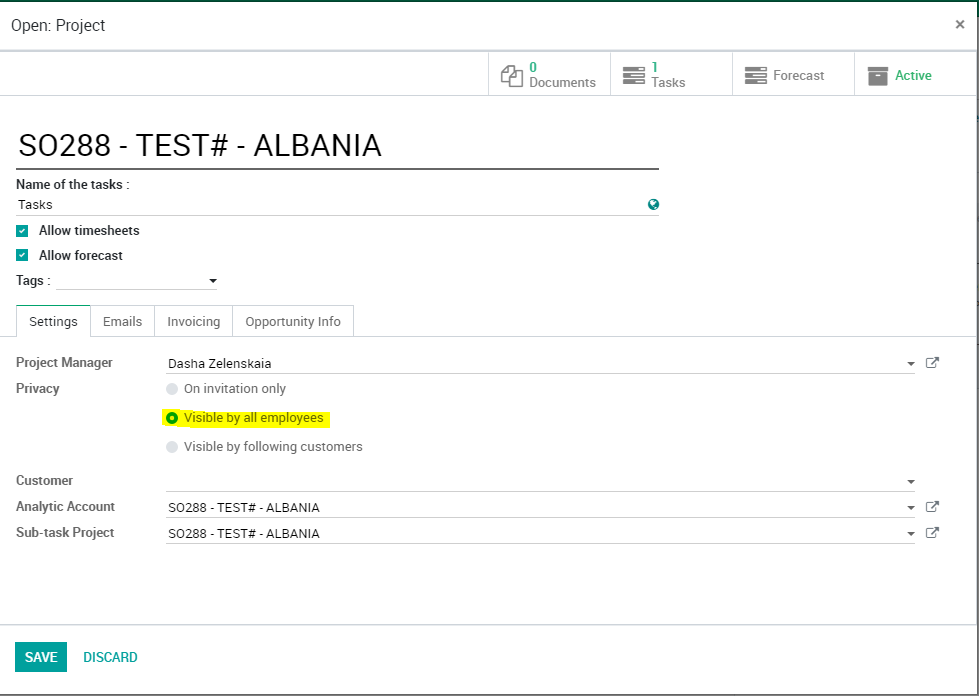
3. Edit the Analytic Account name to match the Project name by clicking the
External Link icon. Click ‘
SAVE’.
4. Edit the Sub-task Project name to match the Project name by clicking the
External Link icon. Click ‘
SAVE’.
5. Click ‘
SAVE’ to save the Project.
6. Return to Task by using the breadcrumbs on top of the screen.
If all the steps are done correctly,
‘Opportunity Info’ tab in the Task should show OPP and SO connected to it.
If ‘Opportunity Info’ tab is missing or doesn’t have the relevant information, it means the OPP, SO, Project and Task are not connected, the steps were not followed correctly. Usually this happens when a Salesperson accidentally creates a new Project instead of editing the existing one. If this happened, Salesperson needs to follow several steps to fix it:
1.
Click ‘EDIT’ in the Task.
2.
In ‘Project’ field search by SO name. Search results should show the Salesperson only one Project with this name. If there are two, it means one of them is wrong, which was created mistakenly.
3.
Pick the right Project in the dropdown.
4.
Click ‘SAVE’ in the Task. If everything is done correctly, ‘Opportunity Info’ tab should appear and show the right OPP and SO numbers.
5.
Go to Project Module.
6.
Search by Client Code or SO number from the Task name.
7.
Identify the wrong Project that was created mistakenly.
8.
Click on the wrong Project (by this time it should NOT have any task connected to it), and then click ‘Archive’ on the top right of the screen (‘Archive’ will appear after hovering on ‘Active’ smart button).
At all times, every OPP must have only one SO, one Project and one Task.