Email Marketing - Newsletter
| 66 minutesEmail Marketing, also simply referred to as Newsletter, refers to the remarketing campaign channel where a curated email covering a specific topic is sent out en masse to an Email List from our existing Lead/Customer database.
The Newsletter marketing channel is primarily used in remarketing to existing Leads that have prior knowledge of and communications with AdvaCare. However, it may also be used as a part of an Outbound Marketing campaign where the target audience will be from a new Leads list gathered. This SOP details the Email Marketing process as a Remarketing tool, rather than for Outbound, but much of the technical processes below will be applicable for Outbound Email Marketing as well.
Objectives
- Generate interest, create urgency, and drive conversions to “stale” Prospects
- Elicit quick Lead conversion to Prospects through easy CTAs
- Building AdvaCare credibility as a one of industry leaders
- Generate traffic to the a specific page of the company website
Newsletter planning is done through the coordination of the Marketing Dept. and BD Dept., and put into the campaign schedule. Every week in the Marketing Sprint meeting, Marketing Dept. Manager must have assigned Newsletters due to be launched in the next weeks to the Campaign Specialist to be worked on in the week’s Sprint Iteration. This SOP details the process from when Campaign Specialist takes over responsibility of handling the Newsletter preparation, including coordination with other Marketing Specialists and BD Dept., up until Reporting of the Newsletter response and result feedback.

The following 6 sections of the SOP cover the different parts and terms used in the company’s Newsletter process. Skip to section Newsletter Process to get to the actual process.
Email Marketing Module on ERP
Newsletters are prepared in the Email Marketing Module of the ERP System. It can be found here:
This section explains the different overview of the Email Marketing Module and relevant details that will affect the Newsletter process.
Overview
The Email Marketing Module consists of the following main pages:
- Mailings: page where newsletters are prepared and sent out. Each item under this page is a prepared Newsletter.
- Mailing Lists: page that contains a curated Mailing Lists, or list of emails that are grouped to receive the same Newsletters. This Mailing List is separate from any other Contact database that exists in the ERP and can be adjusted for each Campaign.
- Campaigns: Campaigns module where Campaign Records can be found. Campaign Records are used to track the performance of campaigns per channel, as well as create UTM links from.
- Reporting: built in ERP reporting page to track period performance of sent Newsletters. This function is not currently fully developed and can be ignored.
When opening the Email Marketing module, the Mailings page will be opened automatically.

Mailings
Mailings page shows the different Newsletters in various stages.
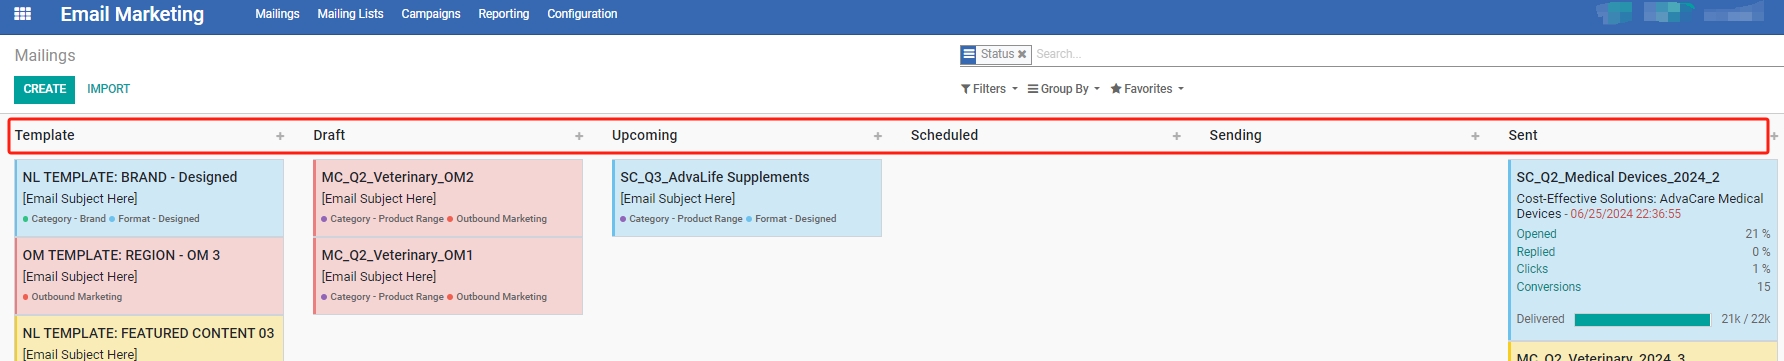
- Template: where all the Mailing Templates are located
- Draft: where newly created Mailings are located.
- Upcoming: where the next scheduled Mailing can be placed under, for easy access.
- Scheduled: where a final draft Mailing scheduled to be sent out is located.
- Sending: when the System is actively sending out the Mass Mailing to the set Recipients.
- Sent: when the Mailing has been Sent to the set list of Recipients.
To navigate the Mailings page, there are a few sections to pay attention to.
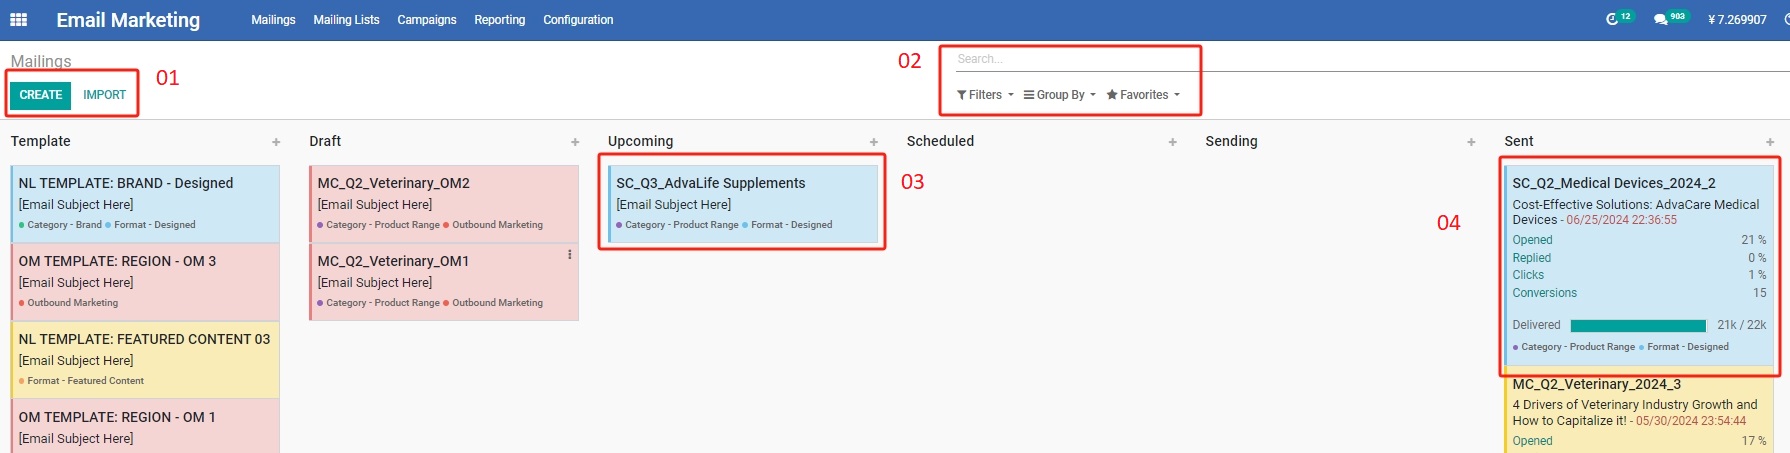
Search function is specifically useful when searching for Templates and Sent Newsletters to refer to when creating a new Mailing.
-
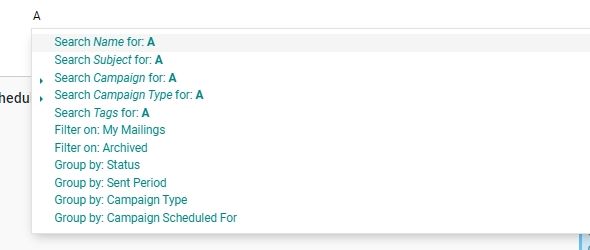
Search bar: field to input specific keywords to find past Newsletters related to the keyword. The search bar contains “Quick Search” filters and “Quick Group By”. This is most relevant in any of the following scenarios:
- Tags: searching for Mailings that have a certain Format and/or Category (Tags).
- Campaign/Campaign Type: searching for Mailings that are under certain Campaign/Campaign Type.
- Filters: to apply filters to view only past Newsletters related to the filter.
-
Group by: grouping function to show past Newsletters based on applied grouping. This is most relevant in the following scenarios:
- Campaign: to group NLs by its Campaigns.
- Campaign Type: to group NLs by Side, Main or Permanent Campaigns.
- Sent Period: to see the different newsletters sent in sequential Months, Quarters or Years.
- Favorites: list of favorited filters that apply to the Newsletters. It applies mostly when looking for Newsletter Templates
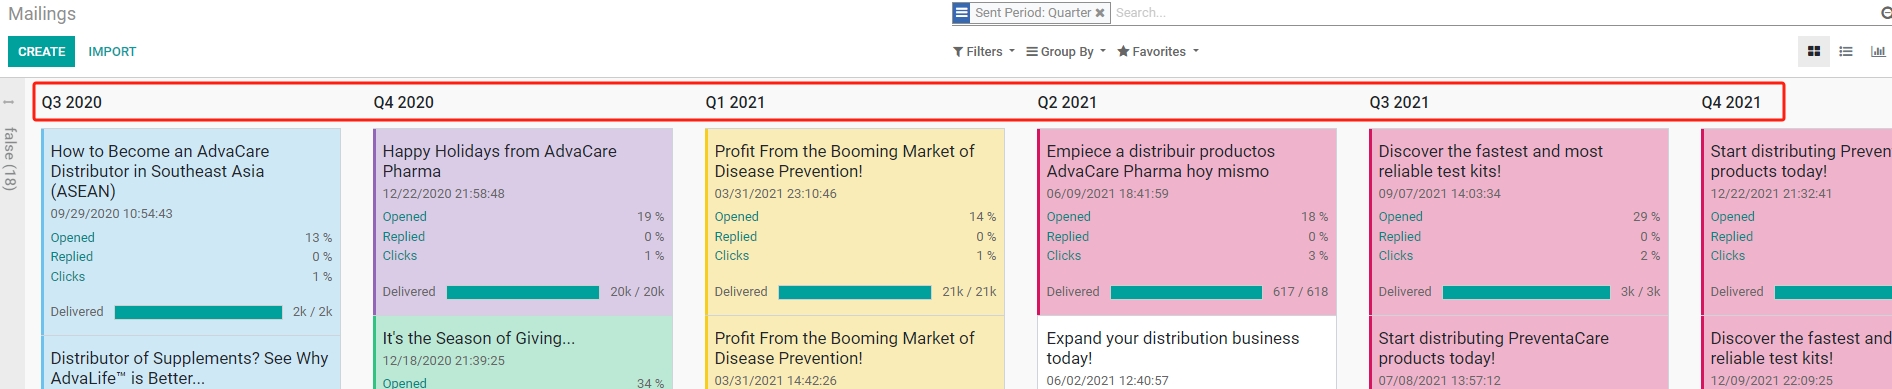
Unsent newsletters have a different set of information shown on its kanban view.
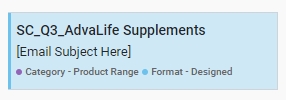
- Name: Name of the Email Marketing for internal reference.
- Email Subject: Mail subject of the Email Marketing
- Mailing Tags: Category and Template of the Mailing
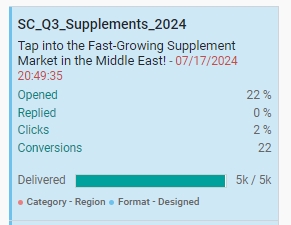
Sent newsletters contain the same information as Unsent newsletter, with the additional sections:
NEWSLETTER WORKSPACE
When clicking on a Newsletter under the Mailings page, the Newsletters workspace will be opened. This will be where Newsletters are created, edited, tested and scheduled to be sent from.
This section will be covered in detail in the Newsletter process.
Mailing Lists
The Mailing Lists tab contains two sections:The Mailing Lists are connected to the CRM Module for Campaign Specialists to keep track of new Leads that are converted from specific campaigns.
Note: Mailing List is a powerful tool where we can potentially track new Inquiries received under the Lead Reply module to a Campaign run for that Mailing List. Therefore enabling full scope of tracking and reporting of Campaign performance in terms of Lead Conversion.
Campaigns
Details related to the Campaigns tab can be found in the main SOP related to Campaign Management. For Marketing Channels other than Email Marketing, UTMs are manually created from the Campaign Record under this tab. However, UTMs in an Email Marketing is auto-generated by the system and therefore access to Campaigns tab is not much needed in this step.
Campaign Specialist just needs to ensure that newly created Email Marketings are correctly connected to a Campaign Record.
Reporting
This function is not currently fully developed and can be ignored for now.
Email Marketing Recipients
Each Newsletter campaign will have its own Recipient list that matches the objective of that campaign, or it may also be a generic campaign that targets ALL potential Distributors in the database. This information will be conveyed from the BD Dept., reviewed by the Marketing Dept. before confirmed to be executed.
The source of Recipients of a Newsletter can be one of the following:- Contacts Module: a group of potential Distributors under our Contacts Module determined to be suitable for the Newsletters. Most of the time, this group is determined by the Newsletter’s Target Markets, ie. Country.
- Mailing List: as explained in the previous section.
For ease of adding the list of email list of the Target Markets, the setting of Email Marketing module can recognize any of the following three Target Market groups:
| COUNTRY | |
|---|---|
| Description | The ERP Contacts module requires each Customer contact card to have its either: Corporate HQ Location or Destination Country to be inputted under the “Country” field. Ideally, the Destination Country is used for most companies which is also where most HQs also operate from. But in some cases where a company deals in multiple countries or has an accounting/shipping process to go through a third country which is not the destination country of the goods, it may also be used. |
| Purpose | When a campaign is targeting a specific country or list of countries. Likewise, it is also used to exclude specific countries which may be blacklisted/restricted. |
| Examples | Tanzania, Nigeria, Ivory Coast, Libya, Guinea, etc. |
| GEOGRAPHIC COUNTRY GROUP | |
| Description | The ERP Contacts module groups each Country into its geographic groups as there are a lot of commonalities between different countries in one geographic region. Often these commonalities are towards the Economic and Market behavior. |
| Purpose | When targeting a general geographic region to focus on. |
| Examples | East Africa, West Africa, North Africa, Southern Africa, Central Africa |
| REGULATORY COUNTRY GROUP | |
| Description | In addition to the Geographic Country Group, a separate country group was created to focus more on splitting countries under a broader geographic scope by its regulatory strictness for pharmaceuticals. It is created primarily for the Registration Module where most countries in 1 Regulatory Country Group will have at least 90% similarity in the registration requirement. The 3 main different regulatory groups are: - Regulated: more difficult requirements, usually site inspection or SRA (EU, US, Australia) certifications will be required. |
| Purpose | When specific regulatory advantage/limitation applies in a campaign, it is easier to determine the target countries by its Regulatory groups. |
| Examples | Africa (Regulated), Africa (Semi-Regulated), Africa (Unregulated) |
The list of countries under each Country Group based on Geographic and Regulatory types can be seen here: Country & Regulatory Groups
- Decide whether REGULATORY or GEOGRAPHIC country grouping will make more sense with the theme of campaign.
- Go through the Regulatory Group list and select suitable groups.
- Think through of exceptions that may be applicable to that campaign, on a per COUNTRY basis.
Example: for a Pharmaceutical product campaign from a specific Vendor that has only standard certification, REGULATORY grouping will make more sense to avoid sending the list to higher regulation countries that anyway cannot accept to register from this Vendor.
Example: using the same campaign example as above, if the said Vendor has already passed inspection of a Regulated country, then that country can be included even though it falls under “Regulated” and is not in the targeted REGULATORY COUNTRY GROUP list.
Likewise, if a Country that presents in the targeted list is already exclusive, or is blacklisted from current campaigns, then they must also be listed down to be excluded from the Target Markets list.
Newsletter Content Category
Regardless of whether the Newsletter is a part of a Permanent, Main or Side Campaign, each Newsletter can follow a specific format of Content Category Template that can fit the purpose of the Newsletter channel.Content here refers to the structure, text, materials and assets that are utilized within various marketing channels to engage with our target audience, on the points that we want to get across.
Following are the different types of Newsletters with a quick example of some Newsletter Email subjects used prior.
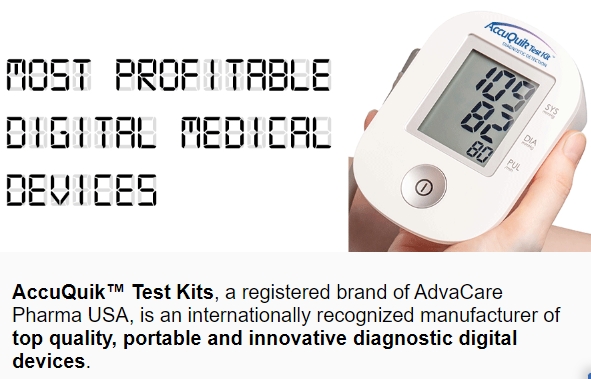
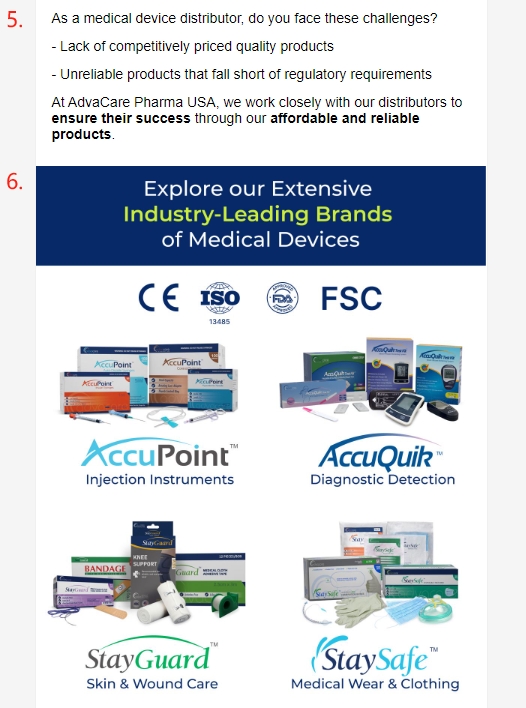
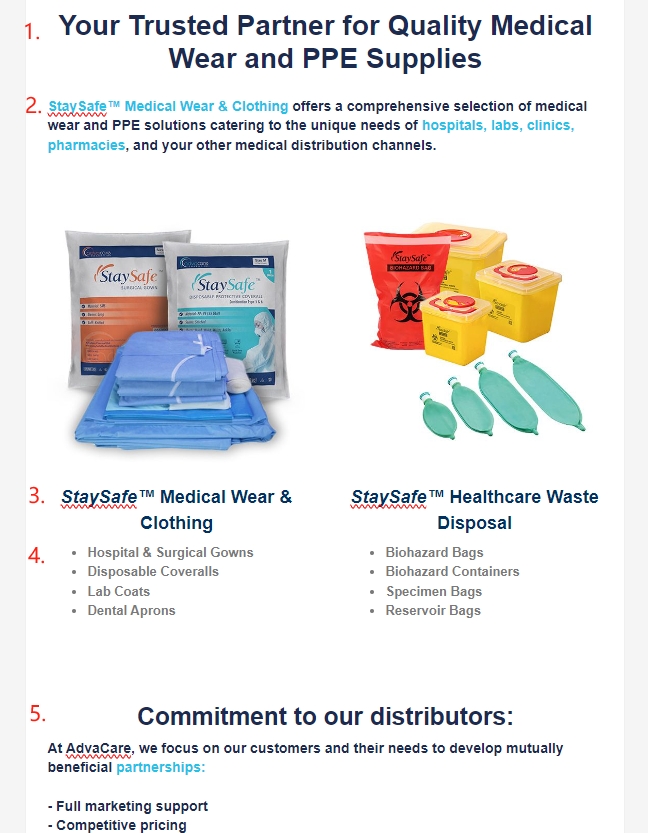
| 1. PRODUCT Category | |
|---|---|
|
Description:
Newsletters about one or more, new or existing AdvaCare Pharma products. |
|
|
Example:
These are the 3 most profitable Digital Medical Devices to sell right now! |
|
| 2. PRODUCT RANGE Category | |
|
Description:
Newsletters about an AdvaCare Pharma full or partial product range. |

|
|
Example:
Why our OTC Medicines Outperform other Brands? |
|
| 3. BRAND Category | |
|
Description:
Newsletters on a full/partial product range of a brand, focusing more on the value of the brand rather than the range. |
|
|
Example:
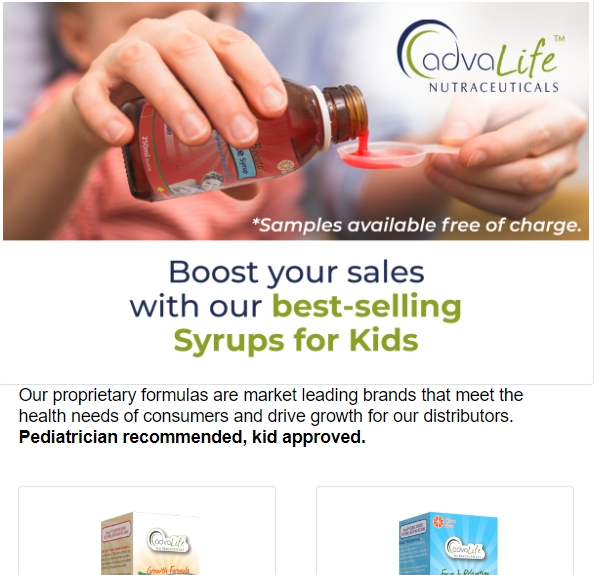
AdvaLife™ Syrups for Kids saw 32% Growth in 2022. How? |
|
| 4. REGION Category | |
|
Description:
Newsletters focused on a specific Country or Region. |
|
|
Example:
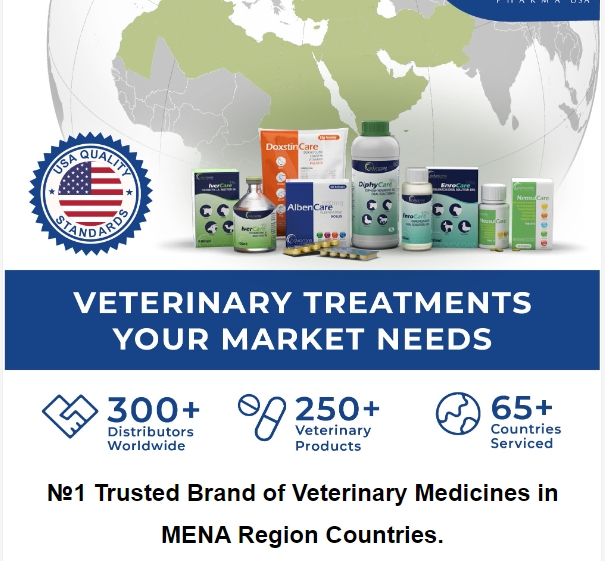
Veterinary medicine for MENA countries. Distribute with us! |
|
| 5. EVENT Category | |
|
Description:
Newsletters focused on an event that is either planned externally (CPHI, VIV) or internally (Sales Dept. Business Trip), this type of newsletter is generally very time sensitive. |
|
|
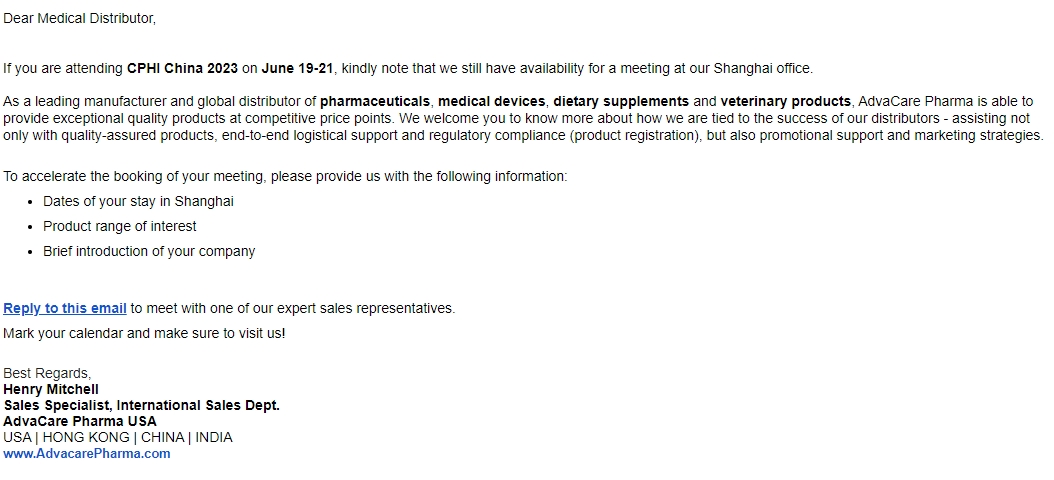
Example:
Let's meet at CPHI China 2023 in Shanghai! |
|
| 6. FEATURED CONTENT Category | |
|
Description:
Newsletters focused on an event that is either planned externally (CPHI, VIV) or internally (Sales Dept. Business Trip), this type of newsletter is generally very time sensitive. |
|
|
Example:
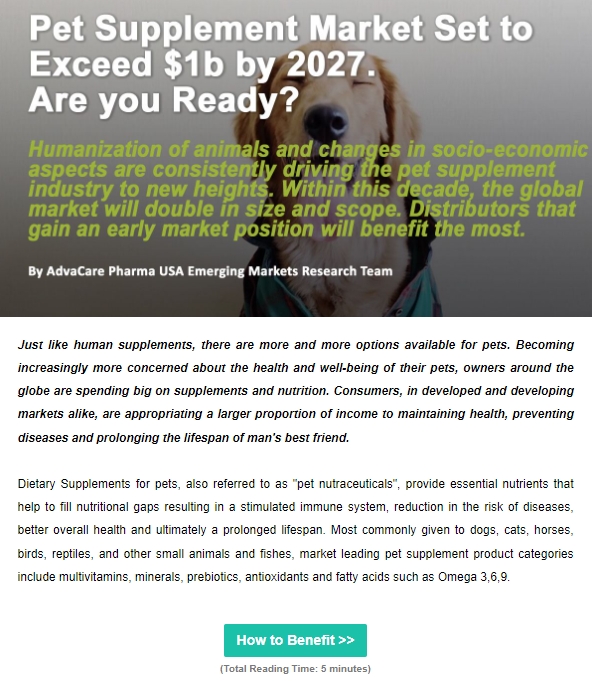
Distributing Pet Supplements? If Not, You Should be. See Why… |
|
When running a Campaign, just because the Category of the campaign is set, does not mean that the Newsletter Content Category for that campaign has to be exactly the same. Meaning, as an example, when running a Main Campaign theme based on a Region, the newsletters to be prepared for the said Main Campaign can be of Product Range category instead. The Target Market of the Newsletter here is determined by the Main Campaign Theme (Region), while the content of the Newsletter is something else (Product Range).
More information about points to consider when preparing Newsletter depending on the category will be explained further in the next parts of the SOP. Campaign Specialist can refer to the templates and previous Mass Mailings under various content categories by searching the category name and selecting the “Tags” search option.

Newsletter Formats
There are three main formats of Newsletters with available basic templates prepared. When a Campaign Theme and Type of Newsletter to be done have been decided, it is important to choose the Newsletter Format to be followed, as it is easier to choose from existing templates and proceed with the customization required for each Newsletter.
Consider these points when deciding which format is to be used:
- Amount of Time required
- Amount of Deliverables required
- Whether multiple Contributors will be needed and their availability
- Whether the format matches the intention of the Campaign Theme
Following are the 3 different Newsletter Formats, the first two being the common ones used in most Content types.
| 1. DESIGNED NEWSLETTER | |
|---|---|
|
Purpose:
to provide a visually engaging layout that can capture the reader's attention to want to know more about the Sender’s message and respond to its CTA. |
|
|
Format:
Visually appealing with consistent branding, often include images, graphics, and a well-organized layout with CTAs spread within. |
|
Tone of Voice:
|
|
| 2. PLAIN TEXT EMAIL NEWSLETTER | |
|---|---|
|
Purpose:
to provide a simple looking email that focuses more on the messaging/values that are offered. It generally has better deliverability. |

|
|
Format:
Standard business communications looking emails with none to limited attachments or links. |
|
Tone of Voice:
|
|
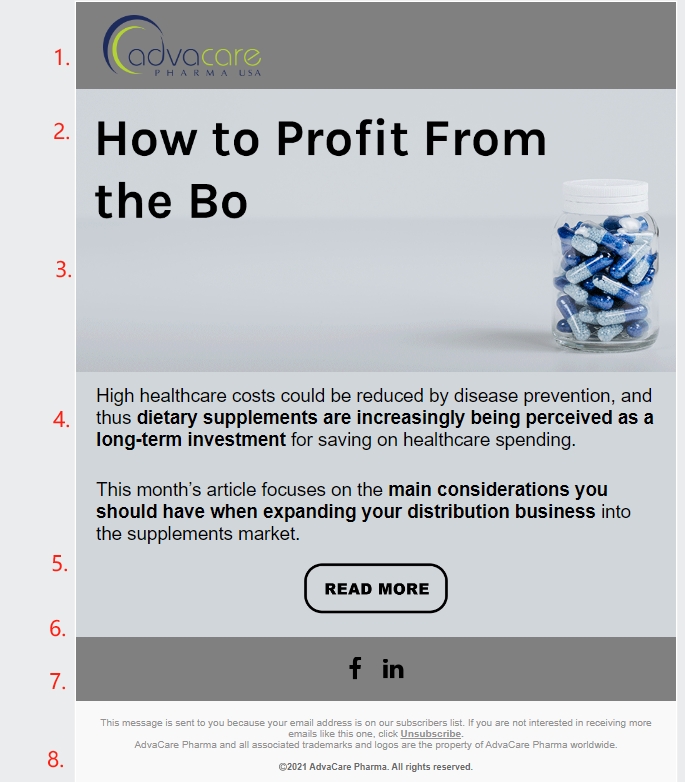
| 3. FEATURED CONTENT NEWSLETTER | |
|---|---|
|
Purpose:
to link new AdvaCare Media Posts where updates, news or informational content related to the industry are covered in depth. |

|
|
Format:
Big titles that seek attention rooted from curiosity of the reader. Descriptive paragraph of what values they can get from reading the full article, and a CTA with a link to the article. It may also include “Relevant Articles” links at the bottom to invite readers to engage in other articles they may be more interested in instead. |
|
Tone of Voice:
|
|
Campaign Specialist can refer to the templates and previous Mass Mailings under various formats by searching the category name and selecting the “Tags” search option.
Newsletter templates are color coded as follows:
- Yellow: Featured Content Newsletter Templates
- Blue: Designed Newsletter Templates
- Green: Plain Text Newsletter Templates
- Red: Outbound Marketing Email Templates
Newsletter Task Description
Depending on whether a Newsletter is to be carried out as a part of a Main or Side campaign, the basic information required to be thought through, listed and understood are about the same. The task descriptions for the Main/Side Campaign Newsletters can be found in the respective project templates:
- Main Campaigns: [Campaign Name] > [Description] Newsletter TEMPLATE
- Side Campaigns: [Campaign Name] NL TEMPLATE
- SSide Campaigns: [Campaign Name] Featured Content NL TEMPLATE
If sub-tasks are to be created for the Newsletter project itself, the following task description can also be copy pasted into the Newsletter task:
|
Description:
Project Owner:[Name] Approver:[Name]
Contributors (Responsible for different deliverables)::
Campaign Name:
Campaign Channel:
Target Markets:
Launch Date:
Goals:
Strategy:
*Target Audience details can be found in the Distribution Channel SOP here:
Acceptance Criteria:
Linked Elements:
|
Newsletter Process
Once Campaign Specialist is assigned with a new Newsletter to prepare in their Sprint, Campaign Specialist can proceed to work on planning and coordinating the multiple parts of the Newsletters.
| I. Planning the Newsletter When: Two weeks before NL launch date |
Milestone | |
|---|---|---|
| Description | Understand the task description, fill in missing parts of the task description and estimate deliverables required from other Contributors. Get approval from the Marketing Dept. Manager for the deliverables and time allocation required from other Contributors. |
|
| Timeline | 1 day: immediately after the task is assigned in the Sprint Meeting, it should take no longer than a couple hours. | |
| II. Preparing Newsletter Content
When: During Sprint but completed no later than 3 days before launch date |
Milestone | |
| Description | Prepare the requirements of deliverables required from other Contributors. Prepare the Newsletter Subject, Body Text & Images, CTAs, and Attachments as applicable. Combine different assets to produce the final NL draft. Run test NL to confirm NL formatting is as intended. Send test emails to NL Approvers for feedback. |
|
| Timeline | 2-3 days: Contributors need enough time to complete their deliverables in coordination with their own workload 1 day: Newsletter Content may take up to half a day to prepare, proofread and refine. 1 day: Combining assets and running tests & potential format revisions may take up to half a day. 2-3 days: Approvers need enough time to provide feedback on the test emails in coordination with their own workload. If an email strategy does not work out and the Final draft is not satisfactory, the above whole cycle may be repeated, it is important to leave enough time before launch date in case this happens. |
|
| III.Configuring Newsletter Setting
When: While waiting for Approver feedback on the Content. |
Milestone | |
| Description | Setting the NL Recipients on the Newsletter Workspace as per Task Description. Setting the correct Sender/Reply to fields as per the NL objective. |
|
| Timeline | 1 day: while waiting for feedback from the Approvers, the Setting can be done in a couple hours at most | |
| IV.Scheduling the Newsletter
When: No later than the morning of the launch date. |
Milestone | |
| Description | Before scheduling, if revisions are required from the feedback provided by the task Approvers, proceed to complete the revision and re-approval process first (Step II). Schedule the NL as per launch date and send a task to inform Marketing Dept. and BD Dept. Managers. The next work day, check to make sure that the NL is sent out successfully. |
|
| Timeline | 1 day: it takes minutes, but provide enough time for BD Dept. Manager to also prepare the BD Dept. for the upcoming replies. It is important to check that the NL is indeed sent out as technical/connection problems may occur during launch period, causing the NL to be canceled by the system. |
|
The above is the very basic process of sending out Newsletters. The following SOP details every step including guidelines on how to write an effective Newsletter based on its Content Category and Format.
Planning the Newsletter
Understanding the Task Description
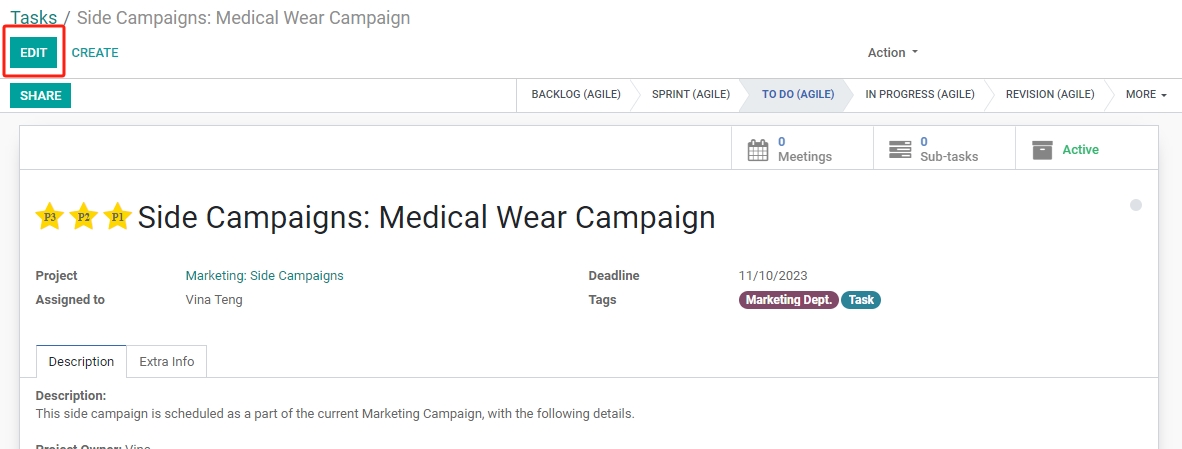
- Locate the assigned Newsletter task. This can be found under the Sprint Tasks of Campaign Specialist, under the “TO DO” stage of the Kanban view. Click to open the Newsletter Task.
- Read carefully the Task Description that has been filled in by Marketing Dept. Manager & BD Dept. Manager. Some information remains blank and to be filled in by the Campaign Specialist.
- Understand the Products/Product Range.
The task description will have some list and details of the products. For Newsletters with a specific Product/Product Range as a part of its theme, Campaign Specialist needs to fully understand the:- Product listthat AdvaCare offers under that range, its form and how they are administered/used
- Brand identityspecific to the product range (eg. AdvaCare OTC products have slightly different brand identity than AdvaCare oncology products)
- Certificates availablefor that product range to include the correct information. General certificates available per product range are shown on the website product pages. However, always double check with BD Dept. Manager if not already mentioned in the task, for each specific Campaign.
This information can be found from seeing the catalog, product packaging and promotional materials designs done for said products before.
- Understand the Target Markets.
Newsletters intended to a specific group of Target Market, Campaign Specialist may want to understand:- General Behavior of the Markets:some countries are more sensitive to prices while some are more sensitive to quality or origin country of a product. This information is live and changes in real time. Refer to the Targeted Countries Profile which is reviewed & updated every 6 months: AdvaCare Targeted Countries Profile
- Regulatory Strictness of the Markets:in general countries that are stricter respond more to suppliers with qualified certifications, compared to lower strictness markets whose interest lay on price/quality advantage. This information is important to decide what content will be more applicable for the Target Markets. Refer to the Regulatory Sheet of this reference: Country & Regulatory Groups
- Primary & Secondary Target Audience: knowing not only the primary but also secondary target audiences of the products will provide better insight into how to format the newsletter, as Campaign Specialist will be able to think from the perspective of the Newsletter Recipients. What are the Potential Distributors thinking when they read the Newsletter? In most simple terms, they want to successfully get products that they can sell to their own buyers. Knowing that, how do we convey through the Newsletter that we offer this exact value for them? Refer to the Distribution Channel SOP to understand Primary & Secondary Target Audiences per product range: Distribution Channels SOP
- Understand the filled-in Goals & Strategies.
This information is crucial for Campaign Specialist to bring together all the above information into one coherent and effective Newsletter. Some directions may have been provided by Marketing/BD Dept. Manager based on their understanding of the Campaign Goals. Campaign Specialist can decide if to follow said directions or provide suggestions if they have better strategies. Regardless, it is very crucial from the beginning that Campaign Specialist understand these points, ask questions if they do not, before proceeding to further materialize the Newsletter concept.
- Understand the Dates.
Depending on the available time until launch date and the amount of workload potentially required, Campaign Specialist can assess which strategy to carry out the Newsletters, if there will be enough time, or a pivot will be required to meet deadlines.
- Once all the above are done, Campaign Specialist can proceed with one of the following:
- All points are clear and ready to proceed with the next step. Follow the next part of the SOP.
- Parts of the Newsletter description is not clear. Send a task to Marketing Dept. Manager & BD Dept.Manager to provide more clarity on points not clear. Once replied to, assess again this whole process.
- Task description is all clear, but Campaign Specialist have a different idea or direction on how they want to carry out this Newsletter. Send a task to Marketing Dept. Manager & BD Dept. Manager to provide details of this as well as the reasoning behind it. Whether the pivot is approved or not, the task description will be updated with the final direction.
Conceptualize the Newsletter Draft and Fill in Task Description
- Now that the basic concept of the NL is ready, proceed to conceptualize the Newsletter content draft. This will help in laying out potential deliverables required from other Contributors as well as the timeline required to complete the task.
- Open the Email Marketing module and locate a template to use from under the “Template” section.
Campaign Specialist can also search to filter templates/previously sent Newsletters to by its Format/Content Category as well, in order to get some reference and inspiration. To do so, type in the Format/Content Category name in the search column and search by “Tags”. - Based on the decided Newsletter Content Category and Format, locate the template(s). The Templates follow the following Name logic:
- After locating the most suitable template, click on the Template Card to open the Newsletter Workspace. On the workspace, click on “Action” and select “Duplicate”.
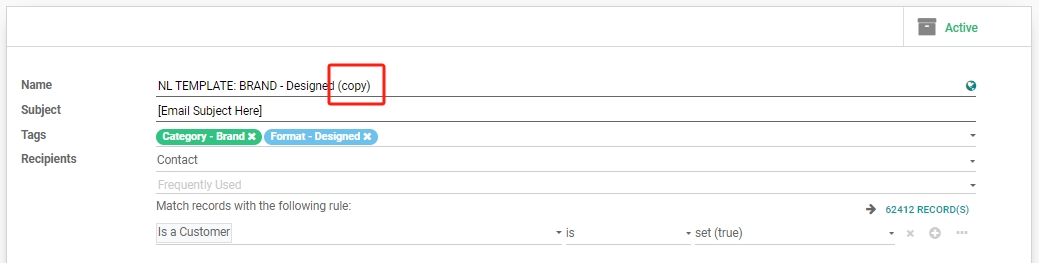
- A new Workspace will be duplicated and opened under edit mode. This can be verified by checking on the Newsletter Name, if it has the “(copy)” text at the end of it.
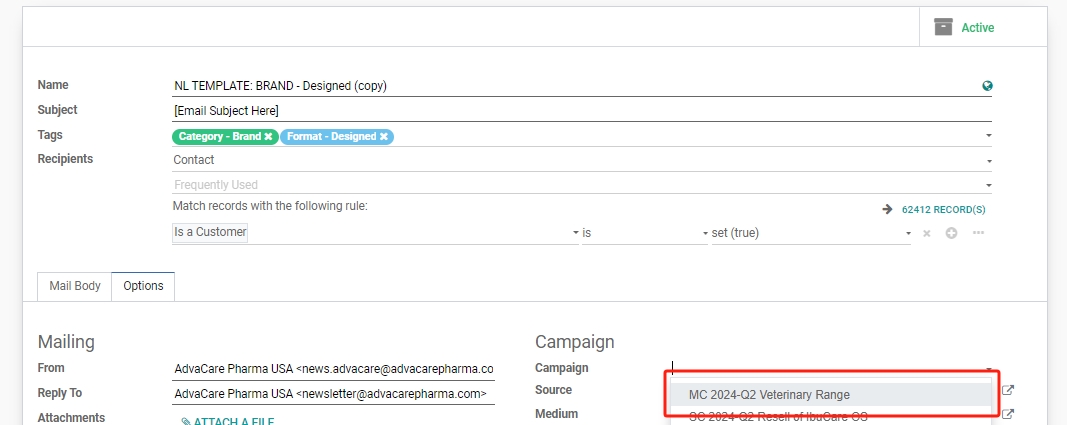
- Open the “Options” tab, locate the empty “Campaign” field and click on it. Type and click to select the Campaign Record created for the Campaign which this Newsletter belongs to.
-
-
Medium:
Select from the dropdown one of the following.- Newsletter: Email
- Outbound Marketing Emails: OM Email
-
Source:
Click on the empty Source field after entering the Campaign and Medium fields. Click on the “Create and Edit” button. On the pop-up window, type in a new Source Name following these rules.- Newsletter: Email
- MC/SC_YYYY_Q[X]_[Brief Description]
-
Medium:
- Go ahead and edit the Subject with tentative Email Subject, or leave it as if for now. Click “SAVE”.
- At this point, the goal is NOT to edit the Newsletter template, rather to use the template as a guide to consider the different parts of the Newsletter that needs to be prepared first, especially if it involves a lot of designs or other deliverables from other Contributors. “SAVE”.
- Copy the link to this Newsletter workspace to be added to the Newsletter Task Description later on, for easier access (see step No. 11, Linked Elements section).
- With the Newsletter Task open next to the Template, start conceptualizing the content that will go into each part of the Template, based on the goals and strategies:
-
Design Images:Newsletter Header, Body, CTAs, Footer.
- How many images would be required to be prepared and to be inputted where?
- Are these images readily available in our current Server? Or does it have to be customized for the Newsletter?
- Are texts required to be included in any of these images?
-
Text Content: Subject, Heading, Body, Image Descriptions, Closing.
- Does Campaign Specialist have all the information required to write the Newsletter?
- Do other departments need to assist in providing contents?
-
Attachments: Product Images, Promotional Material Images, Informational Digital Leaflets, etc.
- Are attachments required for this particular NL? Most NL will NOT require attachments.
- If yes, are these attachments readily available in our current Server? Or does it have to be customized for the Newsletter?
-
External Links: AdvaCare/AC brands website page, forms/surveys, 3rd party links.
- Are links required to be included in the text, image or CTAs of the email?
- Where to and for what purpose are these links included for?
- Are the landing pages of these links already existing and as intended, or does it require webpage development/revision?
- Once the above are answered, Campaign Specialist can proceed to fill in the missing/updated parts of the Task Description by clicking “EDIT” and revising the text under the “Description” section.
- Edit the Task Description as required, but in particular, these parts that are generally left unfinalized before this point:
-
Contributors: write the names of the contributors for each item, or N/A if not required.Add more deliverables as required
eg. Product Catalog, PDF Presentation, etc. -
Strategy: adjust as required. For a longer Newsletter with different sections, Campaign Specialist can also note their concept per section. This does not have to be “final”, just the idea that may be forgotten at later stages.
eg. Header: focus on brand identity and value, First paragraph: introduce brand USPs, CTA link to AdvaLife page, Product pictures: 4 pictures of Syrup A, B, C, and D with a short description of each product, Closing section: certificates available and samples offered for free. -
Acceptance Criteria: organize the different parts required for the NL into a projected timeline to be followed to reach certain milestones. Separate the milestones further if required.
Refer to the “Newsletter Process” table at the beginning part of this SOP to see some estimated times. -
Linked Elements: add the links to the created Newsletter Workspace and Main/Side Campaign Folder in the Server created for the Newsletter Campaign. It is usually sub-folders created under this Campaign Related folder:
Z:\Shared drives\AdvaCare Marketing Control\AdvaCare Marketing Campaigns→ [YYYY] → MC/SC [Campaign Theme Name]
For main campaigns where multiple Marketing Channels are used, there may be another sub-folder just for the Newsletters related assets.
-
Contributors: write the names of the contributors for each item, or N/A if not required.Add more deliverables as required
- Click "SAVE"
- Send a task to Marketing Dept. Manager to inform that the Task Description has been updated with the Newsletter plan. If other Contributors' time will be required, estimate the amount of workload and time required from each Contributor for each Deliverable and include it in the task to get the Dept. Manager’s approval.
Note: Marketing Dept. Manager will read the Task Description carefully and consider the workload of the involved Marketing Specialists, as well as the initial Newsletter strategy discussed with the BD Dept. If big changes are happening from the initial Newsletter task, Marketing Dept. Manager may send a task for BD Dept. Manager’s approval as well to approve before going forth with the project.
- Marketing Dept. Manager will reply via task when the points are confirmed and Campaign Specialist can start working on the details of the Newslettter.
NL TEMPLATE: [Content Category] - [Format]...
Note:Some Content Category + Format combinations have more than 1 available templates for different applications. These options are numbered in the Template Name. Look through each template to select the most applicable template.

|
Note: Normally we link only within AdvaCare main or brand websites, but in some cases forms/surveys or 3rd party links (eg. official MOH website) may be included. |
II. Preparing Newsletter Content
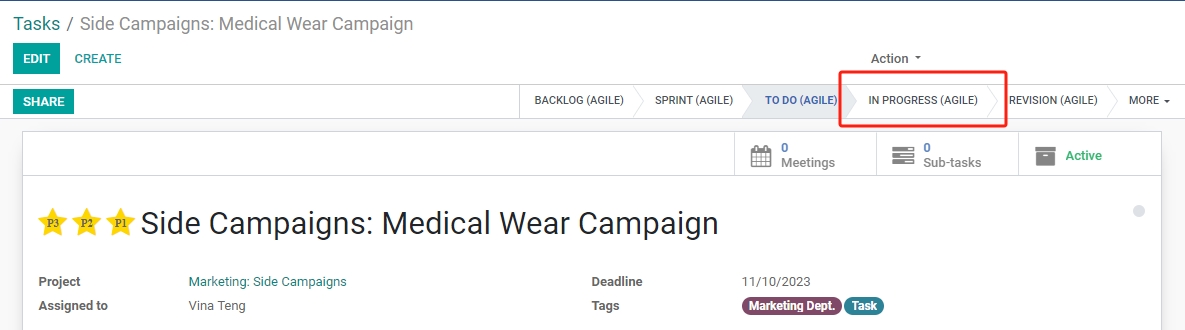
To start working on the Newsletter, open the Newsletter task and move the task stage to “In Progress” by clicking on the stage on the Pipeline tab.
To start working on the Newsletter, open the Newsletter task and move the task stage to “In Progress” by clicking on the stage on the Pipeline tab.
Assigning Tasks for Deliverables
The first and most important thing to start with when preparing a Newsletter is to provide the requirements for certain deliverables required from other Contributors. This is because each staff will have their own daily workload to work around when assigned to a Campaign related task, and additional time has to be considered in case they need to prioritize other tasks first.
- Open the Newsletter Workspace to see the different parts of the NL to be able to describe each section more accurately.
- Write a task to the Contributor(s) to help assist with the NL, include the following descriptions:
- Type of deliverable: image, catalog, banners, etc.
- Which section does the deliverable apply to in the NL: main banner (heading), CTA, product pictures, attachment, closing section, etc.
- The final text to include in the imagesif text will be required in the images.
-
Description of what the images should contain/convey if it applies to the messaging.Sometimes it will be easier for Campaign Specialist to describe exactly what they need an image to show, based on their understanding of the Target Audience, rather than to provide vague direction to Designers who do not have in-depth understanding of the Newsletter background. For example: OTC Pharma will be sold primarily in pharmacies, and need to be attractive to the consumers visiting said pharmacy. Therefore, an image of the products looking nice in a pharmacy, will probably have more impact than the product just being
NoteBe as descriptive, clear and concise as possible when providing requirements. This will reduce time of potential back-and-forth due to unsatisfactory results. If required, have a quick chat with the Contributor after sending the task to explain and confirm all points are understood correctly.
See example below:
- Set an Activity assigned to the Contributor with a reasonable time period (usually 2-3 days for the designs of a Designed Format Newsletter).
Preparing First Newsletter Draft
While the Contributors are working on the deliverables, Campaign Specialist can proceed to complete the first draft of the Newsletter. Open the Newsletter Workspace, click “EDIT”.
- Consider the Tone of Voice to be used depending on the Newsletter Format.
- Professional
- Branded
- Engaging
- Curated
- Polished
- Conversational
- Personal
- Direct
- Less formal
- Authentic
- Intriguing
- Excitement/Enthusiastic
- Urgency
- Interactive
- Encouraging
- Create the Newsletter Subject. Type the Subject Draft into the Subject field of the workspace.
| Format | Tone of Voice |
|---|---|
| Designed |
|
| Plain Text |
|
| Featured Content |
|
The following is some basic guide to provide ideas and different options where Campaign Specialist can get creative with creating an appealing Email Subject. Email subject must have a “hook” to grab the recipient’s attention. There are more possibilities to be creative with the Subject than the following. The different things to consider include:
| Keywords | Make sure the email subject contains the KEYWORD of the campaign theme. It usually resonates with the Content Category meaning: Product Category will have a keyword related to the product (eg. Syrup)Region Category will have a keyword related to the region (eg. MENA) |
| No. of Characters | Ideal # of characters are 41-50 characters, but it does not mean it is limited to that. If the subject is more than 50 characters, make sure to separate the phrases with punctuation (. , : ? !) |
| Value | The subject must either contain the value we can offer, or the implication that we can offer this value (in question tenses) |
| Avoid Spammy Language | Overly spammy language such as “FREE”, “Claim Now”, “Guaranteed”, etc. Check online references for spammy words to avoid. |
| Tone of Voice | The tone of voice of the Subject must match the content. |
| Personalization | In some cases, a Newsletter may be more effective with some personalization by inputting the Recipient’s Company Name or Country. The company name or country field can be pulled in the template by using these placeholders: - Contact Name/Company Name: {{contact_name}}
a. [Individual Person Name] b. If a is blank, it will pull --> [Company Name] Team c. If b is “Unknown”, it will pull --> Medical Distributor Make sure to check how it will apply for the set Recipients |
| Subject Format | Example |
|---|---|
| Informative Phrase | Covid-19 & Livestock Key Takeaways for Veterinary Distributors |
| Value Offering CTA | Get veterinary medicines for MENA region on the budget! |
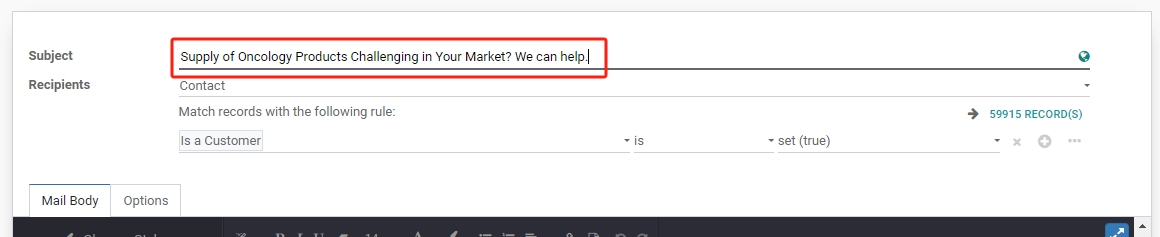
| Value + Question / Question + Value | AdvaLife™ Syrups for Kids saw 32% Growth in 2022. How? Supply of Oncology Products Challenging in Your Market? We can help. Supply chain headache? We won't let it affect your business! |
| Hook! + Description | Shortage no more! Blood Collection Tubes Supply |
| Informative Phrase | The tone of voice of the Subject must match the content. |
| Hook: CTA | Don't miss: Get your 3- Step Guide for Supplements Distributors! COVID-19 & Immunity: 6 Supplements to Distribute |
| Question | Is your medical distribution business growing fast enough? |
Preparing Content Based on Format
Depending on which Newsletter format is being used, the process for preparing the Newsletter Content will be different. Therefore from this point, the steps will be divided based on the Newsletter Format used.
Start with the templates available on the Email Marketing module, that provide options for the most applicable layout for the planned newsletter. Other than content, some adjustments in the body layout may still be required for function/visual purposes depending on each Newsletter. For the most basic example, some product newsletters may contain only 2 products instead of 4, in which case, there will be no need to have 4 slots for product images. This may also apply on whether the placement of CTA makes sense with the content, etc. etc.
-
PLAIN TEXT EMAIL
- Edit the Newsletter Body Layout if required.
Plain text email newsletters are primarily consist of the following:
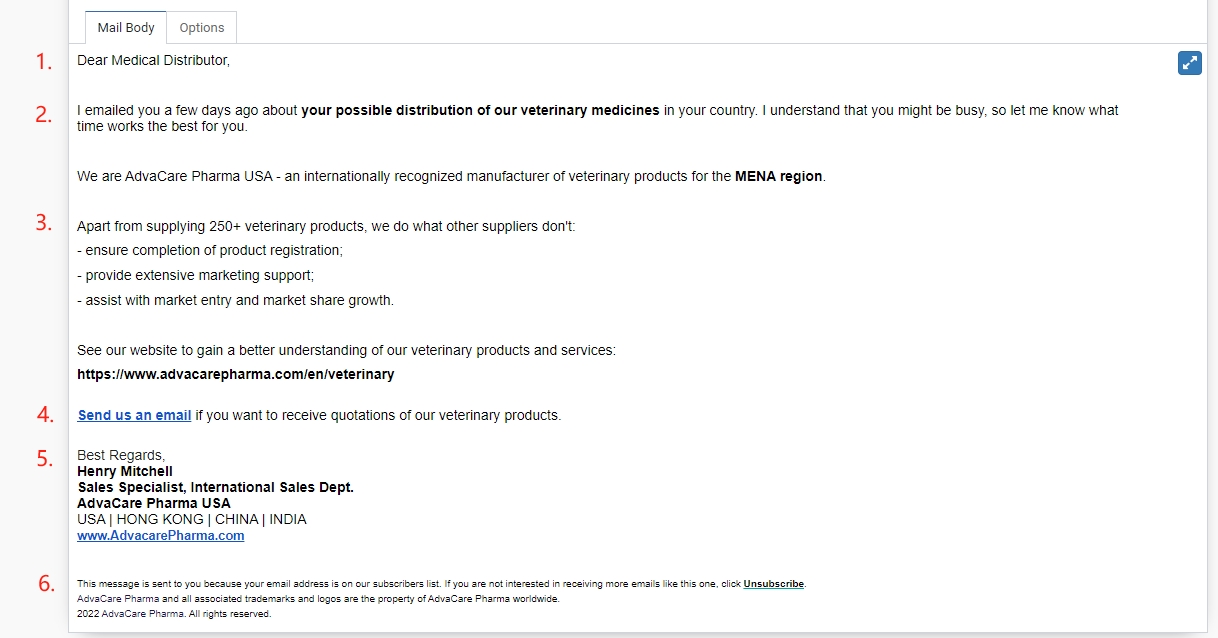
Point No. 3 (content) and 4 (CTA) can be rearranged, sandwiched, etc. per each Newsletter as required. The remaining sections must remain in the above order. To know more about what each section contains and how to edit each section, find the next part of the SOP.
- Edit the Content Text.
- Use commonly used email greetings such as “Dear..” or more personal options such as “Hi…”
- Use greeting titles that are highly relevant to the Theme, so that the Target Audience immediately feels that this email is intended for them and not just a part of a mass email marketing.
- Use of Company Name/Customer Name is a more personalized way to address the Recipient. Use this template as a placeholder for the Name:
{{contact_name}}
This placeholder will pull:
a. [Individual Person Name]
b. If a is blank, it will pull --> [Company Name] Team
c. If b is “Unknown”, it will pull --> Medical Distributor
- Start with a short friendly/informative banter.
- Follow immediately with a direct introduction to the Intention of the NL. Depending on the Newsletter Category, the following keywords are to be included:
- Product: product generic name
- Product Range: product names and forms.
- Brand: description of product(s) under this brand
- Region: Country/Regione
- Event: event name and date, may also include location.
- Featured Content: N/A
- Usually containing at least one of the following: USPs, Special Offers, Document availability.
- Links: it may contain links to an AdvaCare website page relevant to the content.
- Images (optional): may contain an image inserted in the middle of the content, although this is optional and normally not preferred. The steps on how to add an image is covered below.
- Personalization (optional): for better responses, personalization by including Company Name/Country Name. The process is the same as per mentioned in the Greetings. For Country Name, use the following placeholder:{{country_name}}
- “Send a reply” or similar messaging
- Include what the Recipient can get from replying to this action, eg. get a quotation, get catalogs, request free samples, arrange a call with a Sales Rep, etc.
- It may also include a link to an AdvaCare website form. The steps on how to add a link is covered below.
- Includes Name, Title, Department, Company Name, Location, Website. eg.
Henry Mitchell
Sales Specialist, International Sales Dept.
AdvaCare Pharma USA
USA | HONG KONG | CHINA | INDIA
www.AdvacarePharma.com - Main signature used is from Henry Mitchell (Sales Specialist)
- May include other Names/Titles for a very specific campaign, for example, Sales Manager for inactive Distributors.
- Present in every template and does not need revisions.
- Updated only once yearly by the Marketing Dept. Manager.
Under the “EDIT” mode, the Newsletter Mail Body will have a standard text editing function that is very similar to a standard email editor. A few key tips to consider when writing the content of a plain text email newsletter include:
1. Greetings Standard email greetings. 2. Introduction Every email needs a short introduction before jumping into the main topic. 3. Content Main information about the campaign theme. 4. CTA Separate email section with a call to action to draw more attention to it. 5. Signature Email signature is present in all email communications. For the newsletter, it makes the email looks more personal and not just a mass email. 6. Footer NL footer normally contains the Copyright Notice, Privacy Policy, Disclaimers, Opt-Out/Unsubscribe Links and is a MUST in every Newsletter. - Edit the Newsletter Body Layout if required.
- Edit the Content Text Style.
The standard setting of the Content Text Style is as follows, and are already set on every templates:- Text Style: Normal
- Paragraph adjustment: Align left
- Font size: 14
- Font color: Black (#000000)
- Background color: None
In order to make sure some keywords pop and draw attention to most Recipients which will initially be skim reading the emails, text styling is required for some keywords.
The important texts to make pop include:
- Keywords/phrases related to the campaign theme
- Keywords/phrases related to the USPs/Advantages offered
- Links and CTAs
How to style these texts:
- Use of bullet points if content is a list of more than 2 items
Note: if using the bullet style formatting, pay attention to the spacing of the list with the other sections of the content. The style editor has limited customization options and may produce inconsistent formatting. It is always important to test the email from the Recipient’s inbox view and not the workspace. Skip to the Testing the Final Draft section of the SOP to do this.
- Use bold, underline or Italic font style on the keywords
- Change the font color of the keywords/links
Blue: #1155cc
Turquoise: #00a09d
Detailed direction on how to make these adjustments are explained in the Email Marketing Module - Newsletter Editor Manual.
- Edit the Attachments.
As a plain text email, it is preferred to reduce the number of images and links on the email body. The best way to add visual attraction to the Recipients will be through Attachments. However, make sure to limit the amount of attachments as well as the file size of each item in order to avoid being filtered as Spam or overload the Recipient’s inbox.
Some options of attachments may include:
- Product Images
- Product Catalogs
- Digital Promotional Materials (digital flier, poster, etc.)
- Documents: Forms, Guidelines, Certificates, etc. Usually in PDF format.
The steps on how to add attachments can be found here: Email Marketing Module - Newsletter Editor Manual.
Note that attachments should be as compact as possible, in its smallest possible file size without compromising its quality. Use compression tools such as:
Images: https://tinypng.com/
PDF files: https://www.ilovepdf.com/compress_pdf
Note:As this is a plain text Newsletter, do NOT include background color to the hyperlink that makes it looks like a button.
Detailed direction on how to make these adjustments are explained in the Email Marketing Module - Newsletter Editor Manual.
- Edit the Newsletter Body Layout if required.
Designed email newsletters are primarily consist of the following:
Point No. 4 (content) to 9 (CTA) can be rearranged, sandwiched, repeated, and some even removed if not required per each Newsletter as required. The remaining sections must remain in the above order.
To adjust (add or remove) the different sections of the layout from the Newsletter Template, a Side Toolbar can be found on the left side of the Workspace. This toolbar will appear only under “EDIT” mode. If this section is not shown, just click anywhere on the content workspace and it will show up.
Note that the Mail Body workspace can be maximized for easier view using the “Expand” icon on the top right corner of the Mail Body workspace.

Check the current template of the Newsletter and adjust every section according to the concept prepared in the previous part of the SOP. The sections can be adjusted by:
- Removing sections from the template
- Adding new section to the template
- Rearranging (moving) sections in the template
- Resizing a section in the template
Detailed direction on how to make these adjustments are explained in the Email Marketing Module - Newsletter Editor Manual.
- Edit the Content Text.
The following section will explain a few key tips to consider when writing the content of a designed email newsletter followed by the process on how to edit a Designed Email Layout.
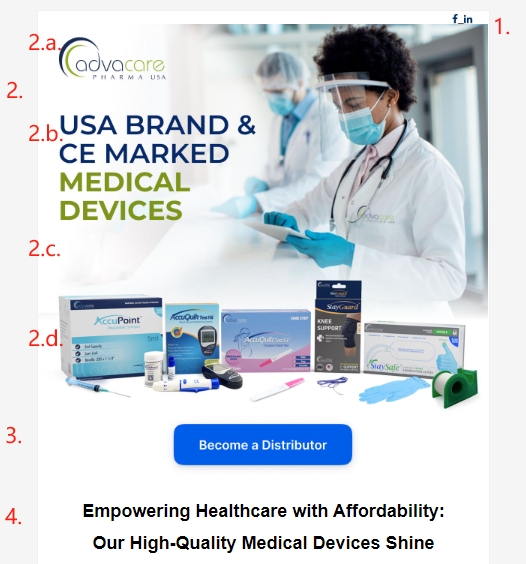
1. Social Media Links Small section linking the NL to AC official Social Media pages. At the moment, only the following pages are added: - Facebook: links to https://www.facebook.com/AdvaCarePharmaUSA/
- LinkedIn: links to https://www.linkedin.com/company/advacare-pharmaceuticals
This section for social media links can be omitted if required, or moved to the footer of the newsletter if it does not match the new design of the NL.
2. Main Banner The main banner will be the first impression for the Recipient as they open the email and hold a very important role in giving an impression. Design Specialist will be tasked to prepare the Main Banner, but with clear directions from the Campaign Specialist. The general design criteria of the Newsletter Banners are: - Clean: not overcrowded or overproduced images
- Overall color tone: white, with blue dominant hue if applicable.
- Main color palette: white, blue, green, light gray
- Text colors: dark blue, green, gray. For Brand newsletters, may incorporate the brand colors.
- Hyperlink: the main banner as an image will contain a hyperlink. If a CTA button is implemented as a part of the Banner, make sure the link corresponds with the CTA. If not, make sure that the link applies to the Newsletter Theme.
More criteria can apply below, depending on the different sections of the Main Banner:
-
AdvaCare Logo
AdvaCare logo added to bring together all different newsletters. Even when a topic is not particularly interesting to a Recipient, the banner will be seen as long as the NL is opened. -
Banner Hook
Short phrases or keywords provide a direct understanding of the NL at the same time invites the Recipient to read further. It may also be the Content Title. -
Background Image
Background image that speaks to the NL theme, must resonate to the Primary & Secondary Target Audiences. Image must be high quality but not reduced in size to minimize load. -
Theme Image/Icons (optional)
Image/Icons related to the theme that immediately shows the Recipient what is offered with this NL (eg. certain products, certain number of product dosage forms, certain certificates available). Images must be high quality under good lighting or renders.
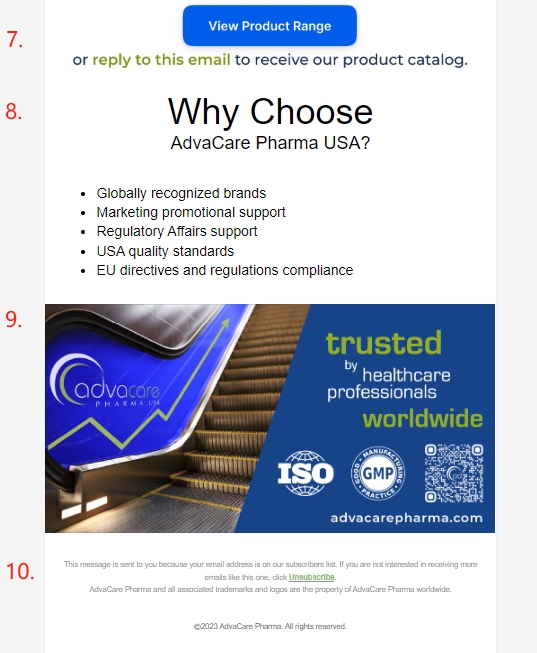
3. CTA (Optional) Call to action that is placed in a quick access for Recipients that are immediately interested, even without reading further. These CTAs usually go to a product/range page or a form on AdvaCare website. Note:the CTA may be designed as a part of the Main Banner, or as a separate section of the NL layout on the Newsletter Workspace depending on how it visually is planned to look like.
The first CTA is more “broad” but clear in that the Newsletter is intended for Potential Distributors, not just curious readers in the field to get more information about the topic at hand. These include options such as:
- Become a Distributor, Distribute with Us,: or similar messaging
- Request Catalog, View Product List, similar messaging
- Product
- Brand
- Event
This CTA is optional for Newsletters with more narrow topics, which is usually the case in the following Newsletter Content Categories:
4. Content Title (Optional) A Content Title may be added if the Main Banner contains only short keywords and a more comprehensive title is required to drive a narrative to the Recipient. Every email needs a short title before jumping into the main topic. - Title must be Informative and/or Intriguing
- Must include a hint of what the AdvaCare can offer, usually in the form of impactful adjectives instead of long winded explanations. Depending on the Newsletter Category, the following keywords are to be included:
- Product: product generic name
- Product Range: product names and forms.
- Brand: description of product(s) under this brand
- Region: Country/Region
- Event: event name and date, may also include location.
- Featured Content: N/A
5. Introductory Content More information related to the campaign theme and supporting argument(s) to the NL Hook/Title. - Make sure to include tips covered in the previous section if Content Title is not included in the Newsletter.
- Usually contains USPs, special offers, document availability, advantages, in a more detailed breakdown
6. Images Practical Images rather than an “Impression” Image such as the Main Banner. The main intention of this section is to showcase as much as possible the offering available, without overwhelming the Recipient with text. - Depending on the Content Category, this section may contain as little as 1 image (a banner) up to 6 images.
- If it contains more than 1 image, consider the use of multiple rows of 2-3 images (PC only) layout.
- May include CTA buttons design incorporated into the Image, or use of a CTA button to break down multiple columns of images.
- Images included are usually: Detailed Product/Product Range/Brand product images
- Images included are usually: Detailed Product/Product Range/Brand product images
7. CTA (Optional) Another CTA that is more narrow in what exactly is wanted from the Recipient. - “Send a reply” or similar messaging
- Include what the Recipient can get from replying to this action, eg. get a quotation, get catalogs, request free samples, arrange a call with a Sales Rep, etc.
- It may also include a link to an AdvaCare website form.
- May be incorporated into the Images above, or as a separate paragraph in the Closing Content below.
8. Closing Content Usually emphasizes again on the benefits of working with AdvaCare, rather than the more focused Newsletter theme. - Use bullet points to break down the text/image repetition if applicable
- Use variety of different font style and sizes if required
9. Company Signature Just like with the plain text emails, a signature is also added in the designed NL, just more designed and tying all the Newsletters to AdvaCare as a company and brand. - Use of an existing template
- May required small design changes in the certifications to be shown
10. Footer NL footer normally contains the Copyright Notice, Privacy Policy, Disclaimers, Opt-Out/Unsubscribe Links and is a MUST in every Newsletter. - Present in every template and does not need revisions.
- Updated only once yearly by the Marketing Dept. Manager.
Do NOT revise the following sections from the template:
- 1. Social Media Links
- 10. Footer
NOTE: Color guideline according to AdvaCare brand manual is as follows:
| Color | Color code / Hex | Uses | Info |
|---|---|---|---|

|
192C52 | Logo | AC Blue logo (Primary Blue) |

|
062967 | Banner hook Hyperlink Content Title |
AC Secondary Blue logo |

|
96AF29 | Highlights for AdvaCare Pharma USP and this must be used in all FOOTER design banner hook |
AC original green logo (Primary Green) |

|
6cbe45 | Secondary green | AC other green logo is used in our dark blue background AC secondary green used on the logo |

|
B1C850 | Icon | green icon on the website |

|
2D57A3 | Icon | Blue icon on the website |

|
19729f | Medical Devices range in primary color (after the standard blue). Hyperlink CTA button |
Medical Devices Catalog blue 1 |

|
b6def1 | Medical Devices range secondary color (after the standard blue). | Light blue - Medical Devices |
|
|
67a6c1 | Medical Devices range secondary color | Medical Devices Catalog blue 2 |

|
4AC5E6 | Primary color for AccuPoint product Hyperlink text |
Blue icon on the website |

|
005494 | Primary color for AccuQuick product Hyperlink text |
AccuQuick |

|
02B15D | Primary color for StayDry product Hyperlink text |
StayDry |

|
25C2E7 | Pirmary color for Staysafe product Hyperlink text |
Stay safe |

|
67B838 | Primary color for StayGuard product Hyperlink text |
StayGuard |

|
1e817f | Primary color for Veterinary range product CTA button |
Veterinary green 1 |

|
6AC7BC | Secondary color for veterinary range product Hyperlink text |
Veterinary green 2 |
|
|
26af5f | Primary color for AdvaMate CTA button |
AdvaMate green |

|
d8d6d3 | Primary color for AdvaMate | AdvaMate green |

|
05996e | Primary color for AdvaLife CTA button Hyperlink text |
AdvaLife |

|
e6f7f2 | Secondary color for AdvaLife | AdavLife light green from the catalog |

|
fcd17a | Secondary color for AdvaLife Hyperlink text |
AdvaLife yellow |

|
005EEA | Standard CTA button | CTA button |

|
DCE3F0 | Secondary color for pharmaceutical product | Light blue on the website Light blue in the pharmaceutical catalog |

|
1f3769 | Primary color for pharmaceutical range products after standard blue Hyperlink text |
Pharmaceutical blue |
- Note that at this point in the process, after the Design Specialist has completed the design of the images as per Campaign Specialist’s requirements, Campaign Specialist can check the images from the file location in the Linked Elements and proceed to add them to the final draft.
- Before adding the banners to the email draft, the image may need to be resized to a smaller size (without compromising image quality). These are some ideal guidelines for general banners:
- File size: not bigger than 1MB
- Width: 600-800 pixels (for a full width banner), less for small images by ratio
- Height: adjust to the width
- For images that did not require Design Specialist’s assistance to produce, make sure to copy the images from its source file location to the folder under Linked Elements for this specific Newsletter. Make sure the image size vs. quality is also optimized here.
- Once all images are ready to be placed in, add/replace the images from the template.
- Once all images have been added, check carefully the content of each image including:
- Text: size, color, spelling, grammar, punctuation, content
- Images: visual appeal, color scheme, image resolution, details (AdvaCare logo), CTA color, text & size, Icons if it applies to the Newsletter.
- Once uploaded, it is easier to see whether a prepared Image visual direction and its content is suitable for the Newsletter or not. At this point, if changes in the image design will be required, note them down clearly and send a task to the Design Specialist to start working on the required revisions.
- Once the revisions are ready, a task will be received from the Design Specialist again. Repeat the process from Step a. above until the final image is confirmed.
- Once the final image is in place, make sure to add the Description - Title and Alt Tag of the image.
- Lastly, some images may act as a hyperlink for a CTA or just image redirection in general. Add links to these images.
- Next is the CTA section. CTA can be decided not to be added as a part of an image or banner, rather a standalone section from the module. This is usually preferred as the CTAs added this way will have its size automatically adjusted to the different devices and platforms that may be used by different Recipients. This part is applicable for the Sections:
- 3. CTA
- 7. CTA
- Proceed to add/move CTA buttons to applicable sections. Make sure to revise the CTA text, color, shape and link if needed.
- Finally, in order to make sure some keywords pop and draw attention to most Recipients which will initially be skim reading the emails, text styling is required for some keywords. Some ways on how to style these texts are through the following which is accessible from the Mail Body Toolbar:
- Use of bullet points if content is a list of more than 2 items
- Use bold, underline or Italic font style on the keywords
- Change the font color of the keywords
- 4. Content Title
- 5. Introductory Content
- 6. Images
- 8. Closing Content The standard setting of the Content Text Style is in the below table, but can be adjusted as required.
- Change the image from the template
- Add Title and Alt Tag to the new image
- Add links to the image
- Add/Move CTA button to an applicable section
- Revise the CTA text, color, shape and link if needed
- Revise text content and style to make the important keywords pop as needed (see below table)
- Font color: Dark blue (#1b2b4f)
-
CONTENT TITLE
- Paragraph adjustment: Center
- Text Style: Header 2, Font size: 28, Bold
-
CONTENT
- Paragraph adjustment: Align left
- Text Style: Normal, Font size: 14, Bold
-
IMAGE TITLES
- Paragraph adjustment: Center
- Text Style: Header 4, Font size: 18, Bold
- Color: adjustable based on theme
-
IMAGE DESCRIPTION
- Paragraph adjustment: Align left
- Text Style: Normal, Font size: 13, Bold
- Color: Gray (#797979)
-
SECONDARY TITLES
- Paragraph adjustment: Center
- Text Style: Header 3, Font size:<28, Bold
Note that some images that may just be a small icon can even be smaller. In the Testing stage down below, make sure to also pay attention to the images to ensure the image quality is not compromised.
Note: Image names must be made as clearly as possible, and a short description of the image. This name will be visible to the email recipients and should not contain internal information.
Note: As previously mentioned, any requirements that will involve other Contributors will need to be informed to the responsible person as soon as possible as there may be some time required until the deliverables are ready.
Note: The general colors used for the CTA is blue, followed by the turquoise color.
Other settings include Size: Large and Style: Rounded, which should be defaulted from the template.
For the following steps, follow the detailed direction from the Technical Manual: Email Marketing Module - Newsletter Editor Manual
|
GENERAL:
|
|---|
- The Newsletter Body Layout for Feature Contents is not currently final and must be adjusted to the new website. Regardless, it must contain the following elements:
For now, use the template and adjust the different sections as required. Depending on the topic of the Feature Content, every Featured Content NL may vary to focus on the topic at hand. - Edit the Content Text.
The following section will explain a few key tips to consider when writing the content of a Feature Content email newsletter.
1. Header AdvaCare logo for instant recognition of the featured content mail. The header may also contain links to AdvaCare sites or range sites. It may also include the social media links below:
- Facebook: links to https://www.facebook.com/AdvaCarePharmaUSA/
- LinkedIn: links to https://www.linkedin.com/company/advacare-pharmaceuticals
This section for social media links can be omitted if required, or moved to the footer of the newsletter if it does not match the new design of the NL.
2. Main Banner Title The title of the main banner is crucial for grabbing the attention of your audience. Audience will decide the relevance of the media NL to them, and decide whether or not to further engage with this media NL. The purpose here is to get the audience to be interested in getting to know more about the topic proposed, and to slowly build the AdvaCare credibility in the long term.
3. Main Banner Imager Other than the title, the banner image/gif is an important first impression for the Recipient. The general design criteria of the Newsletter Banners are:
- Clean: not overcrowded or overproduced images
- Overall color tone: white, with blue dominant hue if applicable.
- Main color palette: white, blue, green, light gray
- Text colors: dark blue, green, gray. For Brand newsletters, may incorporate the brand colors.
Make sure that the banner image size vs. quality is optimized here.
4. Introductory Content A paragraph that contains:
- Brief and intriguing teasers for the article, providing a taste of what the reader can expect without giving away too much information
- Compelling descriptions that highlight the value or key points of the article
- Personalized language that speaks to the reader to resonate with their needs or curiosity
- Highlight the benefits of reading the full article
5. CTA Must be strategically positioned to be very accessible. Use phrases like:
- “Read More”
- “Explore Now”
- “Learn the full story”
- “How to Benefit”
6. Other Article Links (optional) Depending on the topic, the Featured Content NL may want to include links to other articles that some reader may find more interesting or relevant. This includes articles related to different ranges, different topics of “problems & solutions”, and others. Make sure that the images and titles to the other articles are clear and concise. Make sure that the banner image size vs. quality is optimized here. These images are very small and should be no more than 200kb each. 7. Closing links (optional) Add other links to be included that may be related to the topic or the company. 8. Footer NL footer normally contains the Copyright Notice, Privacy Policy, Disclaimers, Opt-Out/Unsubscribe Links and is a MUST in every Newsletter.
- Present in every template and does not need revisions.
- Updated only once yearly by the Marketing Dept. Manager.
- Detailed directions on how to make these adjustments are explained in the previous PLAIN TEXT EMAIL & DESIGNED EMAIL NL part of the SOP under Step No. 3.
Testing the Final Draft
It is important to always test a Newsletter Draft from the actual view as an email, instead of through the Workspace. This is because some formatting values that may not be visible from the Workspace can translate into the final formatting of any parts of the Newsletter.
It is also important to see the Newsletter Draft on both Desktop and Mobile perspective. This SOP details every step of this process:

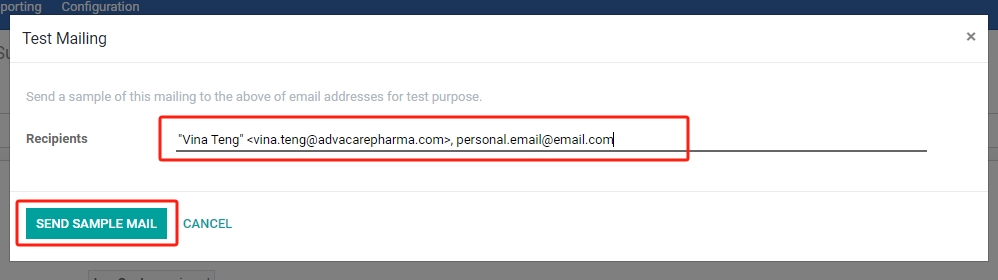
[first].[lastname]@advacarepharma.com, myemail01@email.com, theiremail02@email.com
Note: this information will not be saved in the ERP system so there is no fear of personal emails being recorded unwillingly.
- Images: load time, resolution, elements if properly sized, spacing between images and text.
- Text: load time, resolution, elements if properly sized, spacing between images and text.
- Text Format: spacing between paragraphs/bullet points, size, color, style.
- Hyperlinks: correct links, correct colors or style
- CTA buttons: size, color, text style
- More often than not, some sort of revisions WILL be required from the first “Final” draft. Go ahead and open the Workspace and make the necessary changes. Most importantly, send a task to other Contributors if revisions in their deliverables will be required as this will take the most time.
- Once all revisions are done on the Workspace, always save and TEST the email again. A revision is not confirmed until they are visible on the email view, NOT workspace view.
- Repeat the steps as required until the Newsletter Final Draft is finally ready for confirmation.
Most points are easier to check from Desktop (ie. hyperlinks, spelling), but Mobile view is very very important to check whether the designed template and formatting are functional and efficient for Mobile Users. As the edits are done on desktop, formats may look totally different than expected on Mobile.
Sending a Task for Final Draft Approval
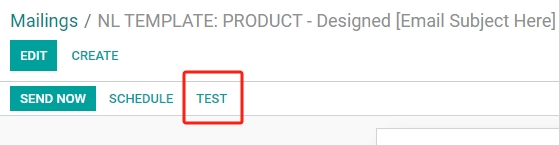
- Open the Newsletter Workspace, click “TEST” and send the final draft test emails to Marketing Dept. and BD Dept. Manager. If unsure of their email address(es), it follows the same logic as any AdvaCare staff email:
firstname.lastname@advacarepharma.com - Under the Newsletter task, send a task to Marketing Dept. and BD Dept. Managers to inform them that the Newsletter draft is ready to be checked and confirmed.
III. Configuring Newsletter Settings
As the Newsletter draft is under review with the Dept. Managers, move the Newsletter task stage to “Revision” by clicking on the stage on the Pipeline tab. In the meantime that the Newsletter content is under review, Campaign Specialist can take this time to set the various configurations of the Newsletter Settings.
Setting Correct Sender/Reply to Fields
Just as with any emails, the Newsletter will be sent out from an email address what the Recipients will see as the Sender (From) and a potentially different email address when they click on the Reply to.

This SOP highlights the importance of correctly setting the "Sender" and "Reply-To" values when sending newsletters. Proper configuration of these values enhances email deliverability, builds trust with recipients, and fosters effective communication. Follow this process to check and make sure that the correct Sender/Reply to values have been set on the Newsletter.
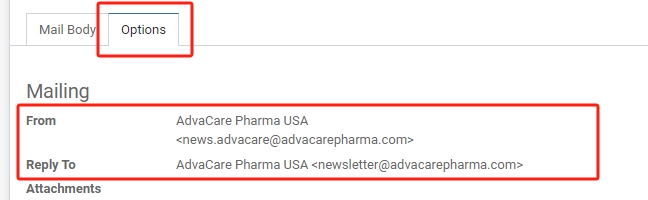
- On the Newsletter Workspace, click to open the “Options” tab.
- Click “EDIT” to revise the “From” or ”Reply To” values if required. Following are the standard rules of these values, depending on the Campaign Purpose and Format:
Purpose of Newsletter Format Setting Remarketing Plain Text Email From
Henry Mitchell (AdvaCare Pharma USA)
<news.advacare@advacarepharma.com>
Reply To:
AdvaCare Pharma USA
<newsletter@advacarepharma.com>Designed Email Featured Content Email From
AdvaCare Pharma USA
<news.advacare@advacarepharma.com>
Reply To:
AdvaCare Pharma USA
<newsletter@advacarepharma.com>Outbound Marketing Plain Text Email From
Henry Mitchell (AdvaCare Pharma USA)
<henry.mitchell@advacarepharma.com>
Reply To:
Henry Mitchell (AdvaCare Pharma USA)
<henry.mitchell@advacarepharma.com>Note: The above values may be adjusted for specific campaigns with approval from Marketing Dept. Manager.
- Once revised as required, click “SAVE”. These fields will also need to be tested and checked through actual email view which can be done at a later stage with revisions from the Dept. Managers.
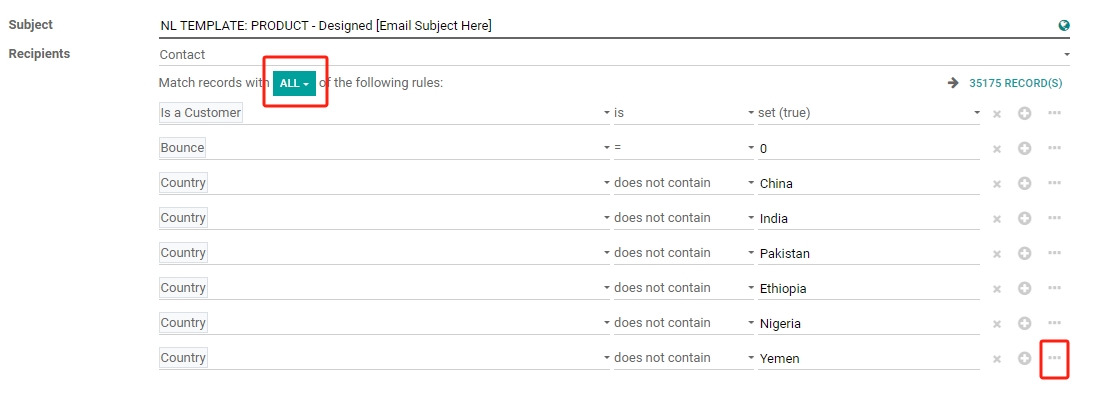
- Open the Newsletter Workspace, under the “Recipients” field in the “EDIT” mode.
- For Remarketing Purposes, click to select the “Contact” option from the dropdown of the Recipients field.
- Under the Frequently Used field, two dropdown options are available:
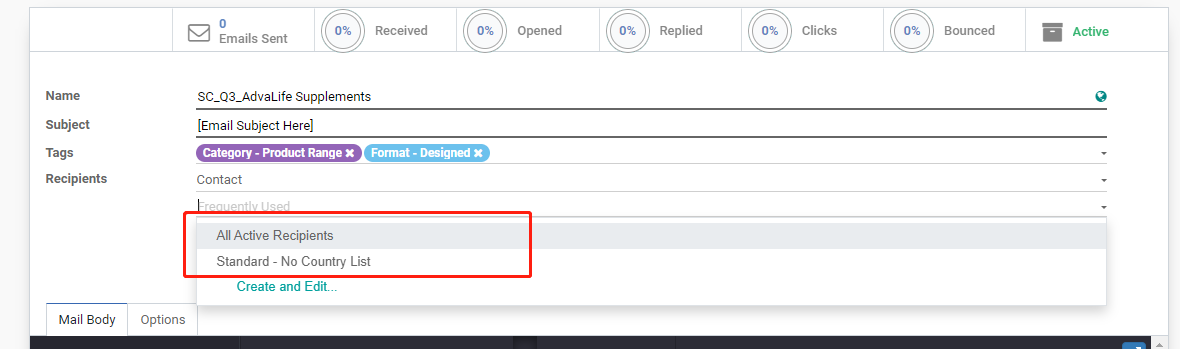 These settings are a group of filters applied to the Contact card recipients, as a setting most commonly used in most remarketing Newsletters:
- All Active Customers: all recipients excluding Blacklisted/Restricted country list. Campaign Specialist can pick this frequently used group of filters when the NL is to be sent to most countries minus some exceptions.
- Standard - No Country List: all basic settings for valid newsletter recipients, without country list. This is more useful when wanting to add a country list rather than excluding.
- A number in turquoise will appear showing the number of Contact persons that are eligible to receive the Newsletter under the current setting. As no additional rules are added yet, this current number is the total number of Leads/Distributors in the Contacts Module.
- To add a new rule, click on the ( + ) “Add node” icon. To remove a rule, click on the ( x ) “Delete node” icon.

- Adjust the rules, starting with the general rules that apply to ALL Newsletters below. Once a new rule is added, click on the:
- “ID” field to change the rule condition
- “=”field to change the condition of the value. Most commonly used are “=”, “contains”, “does not contain”.
- "1" field to edit the value of the condition. This field will be removed if in the previous section, “is set” or “is not set” has been chosen.
For all Newsletters, the most basic rules generally include the following
Is a Customer is set (true) Email is set (true) Bounce = 0 Customer Tier does not contain Tier 5 Country does not contain China Country does not contain India Country does not contain Bangladesh Country does not contain Pakistan Country does not contain Ethiopia* Country does not contain Nigeria* Country does not contain Yemen* To briefly summarize, the above rules will send the Newsletter to all Leads/Distributors in the Contacts module that are classified as “Potential Customer” and not a Vendor/Unsubscribed Leads, does not have prior bounce records, and is not located in a Blacklisted/Restricted Country list that is set for marketing.
*These countries are under the “Restricted Country” category at the time of writing this SOP and may be updated. List of Blacklisted and Restricted Countries can be found in the Country group sheet:
Country & Regulatory Groups - Next, adjust the additional rules that apply to this specific Newsletter. This information is listed in the Newsletter Task Description under the Target Markets section.
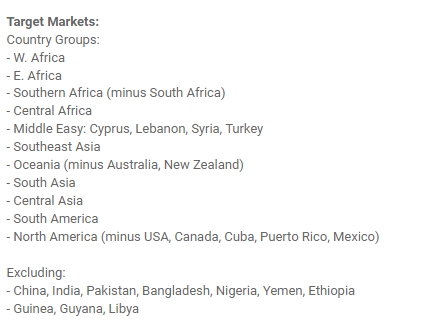
- Often, BD Dept. will suggest to carry out Newsletters according to Country Groups (Geographic or Regulatory), instead of listing every country possible one by one. At the same time, there may be individual countries under a Country Group that may need to be excluded due to a variety of reasons. The list of countries and the names of these Country groups can be found here: Country & Regulatory Groups
- When
excluding
some Countries/Country Groups, and all remaining Contacts can be eligible, use:
Frequently Used: All Active Recipients and add ( + ) “Add Node” function with this rule: - If targeting a list of Countries/Country Groups, use: Frequently Used: Standard - No Country List and add a branch needs to be created. This is because the existing branch contains the rule to match “ALL” requirements, while when targeting a list of groups, the rule must be to match “ANY” of that requirement.
- At the bottom of the current list of rules, click on the ( … ) “Add branch” icon.
- A new “branch” will appear, with a separate rule of “ANY” requirement. Edit the values to Country/Country Groups as per previous part of the SOP and add more nodes with the“Add Node"function if more will be required.
- Once all rules are set, proceed to click “SAVE”. The final Recipient rules will look something like this picture:
Selecting the Recipients
As previously covered, there are two main sources of the contact list to be used as the Recipients of a Newsletter. The different sources are used separately depending on the Campaign Purpose.
| Campaign Purpose | Source |
|---|---|
| Remarketing |
Contacts Module Database of Leads/Distributors gathered over time that has had prior communications with AdvaCare either via website, social media, or direct communications with a Salesperson. |
| Outbound Marketing |
Mailing List - Primarily a database of Potential Leads gathered from Outbound Marketing Research, grouped to have its own marketing purpose. - But it may also be used to create a list of existing Leads/Distributors from the Contacts module, that is grouped into one list for a specific marketing purpose |
I. REMARKETING


A simple rule to follow when handling this is:
| Country | does not contain | [Country Name] |
|---|---|---|
| Country | does not contain | [Country Group Name] |
IMPORTANT: The Country/Country Group names MUST be the exact spelling as per the g-sheet, which is as per the Contacts module. It also must not contain unnecessary spacing after the text. Otherwise, the system will NOT match the values typed in with Country in the Contacts Module.

The rules can be any of the following:
| Country | does not contain | [Country Name] |
|---|---|---|
| Country | does not contain | [Country Group Name] |
IMPORTANT: The Country/Country Group names MUST be the exact spelling as per the g-sheet, which is as per the Contacts module. It also must not contain unnecessary spacing after the text. Otherwise, the system will NOT match the values typed in with Country in the Contacts Module.

Pay attention to the number of “XXX RECORD(S)” at the bottom of the rules. This number indicates the number of Contact Persons which the Newsletter will be sent to. Inputting wrong rules under a wrong branch could cause the final number to be much smaller or even 0.
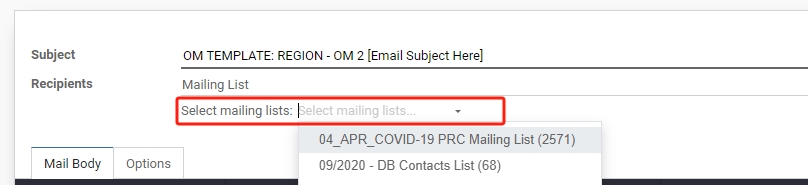
II. OUTBOUND MARKETING
- Make sure the Email List has already been pre-created into a Mailing List under this Mailing Lists model.
- Open the Newsletter Workspace, under the “Recipients” field in the “EDIT” mode.
- For Outbound Marketing Purposes, click to select the “Contact” option from the dropdown of the Recipients field.
- Click on the “Select mailing lists:” empty field and type to locate the Mailing List intended for this Newsletter. More than one Mailing Lists can be selected if required.
- Once selected, click “SAVE”.

Final Revision and Approval
Now that all Settings have been configured, the only remaining step is to get task approval/revision from the Dept. Managers on the Final Draft.
- Marketing and BD Dept. Manager will send a task to Campaign Specialist with either:
- Approval of the draft as final version ready to be sent →In this case, skip the remaining steps below and proceed to the next section IV. Scheduling Newsletters.
- Directions for revision to the Newsletter draft →Continue with step 2 and so on.
- Read carefully the directions for revision. Immediately ask questions if any point is unclear.
- For revisions that require involvement of other Contributor’s, send a task to the Contributor as soon as possible with a detailed list of revisions required.
- Proceed to revise the Newsletter draft as per other suggestions provided on the Newsletter Workspace.
- Bring together any new images/deliverables revised by other contributors to the Revision Draft.
- Once all comments have been addressed in the Draft, save and ALWAYS test the Newsletter by sending it over email for final review as an email.
- Repeat as necessary until the Final Revision Draft is ready.
- Once ready, send the Final Revision Draft test email to the Marketing Dept. and BD Dept. Managers again, followed by a task under the Newsletter Task for final approval.
- Once final approval has been received from both Managers, do one last final check by testing the Newsletter on a new recipient email address (that has not been tested on prior). Campaign Specialist can use any of the email addresses under the Emails for Mailing Tests list, should they have access to it.
NOTE: It is important to test the final newsletter on a new recipient, due to caches. During the Newsletter revision process, some changes may be applied that are not seen on Recipients that have received the previous version.
IV. Scheduling Newsletters
Scheduling Launch Date and Time
- Open the Newsletter Workspace.
- Click on the “SCHEDULE” button on the top left corner.
- A pop up window will appear with an empty field and a Calendar view.
- Click on a date of which the Newsletter is scheduled to be sent out, eg. December 6. This date is according to the “Launch date” section under the Newsletter task description.
- Then click on the clock icon below for the “Select Time” function. Input the desired time for the Newsletter to be sent out, which is generally 19:00:00 (China Standard Time) unless specified otherwise in the task description.
- Click “SCHEDULE”.
- On the Workspace, a new tab in blue will appear with the Date and Time of the scheduled launch to confirm that the Newsletter is scheduled to launch in place.
- After confirming that the Newsletter has been scheduled, go ahead and send a task to Marketing Dept. and BD Dept. Managers that the Newsletter has been scheduled for which Date + Time.
- At the same time, set an Activity for yourself for D+1 of Launch Date to check and confirm whether the Newsletter has indeed been sent out.
- Move the Task back to the “IN PROGRESS” stage.
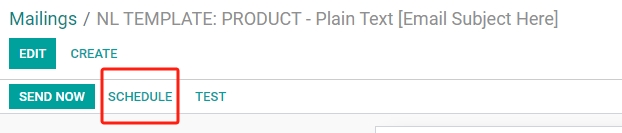

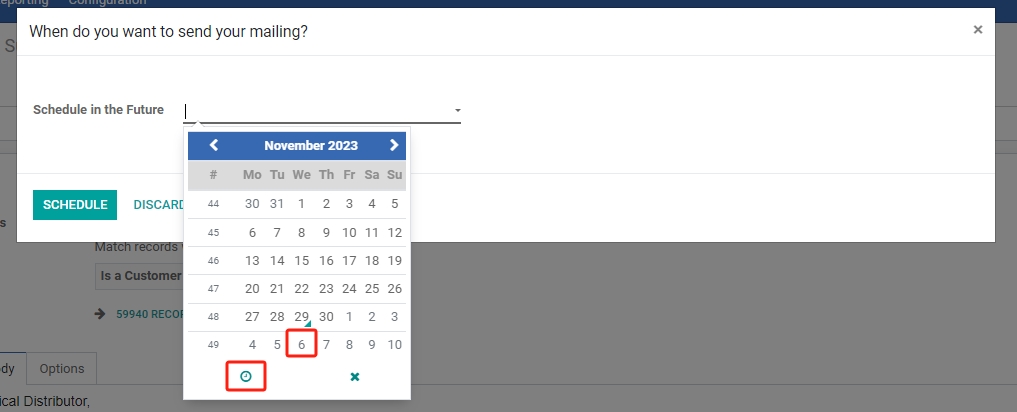
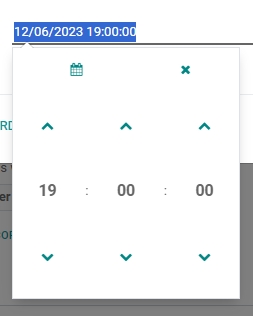

Note: if a Newsletter is accidentally scheduled wrongly before the final version, or is scheduled for a wrong Date/Time, it can still be cancelled by clicking on the “CANCEL” button that is next to the test button.
Confirming Newsletter Launch
- D+1 of the Newsletter launch date, Campaign Specialist will receive an Activity notification created prior.
- Locate the sent Newsletter Workspace. Sent emails will have the following new statuses.
- Stage: Newsletter Workspace stage has been automatically moved to “SENT”.
- Ignored/Failed Emails: The notification tab will contain the number of Email Addresses out of the Recipient list that has been ignored (not sent to), due to avoiding bounce/blacklisted emails from the list.
- Conversions: number of Leads/Opportunities converted from the newsletter
- Emails Sent: number of emails sent will be shown
- Received: % of emails that have successfully received the Newsletter out of the Emails Sent.
- Opened: rate of opened emails thus far
- Replied/Clicks: these functions have not been properly implemented and thus do not provide accurate information.
- Bounced: number of bounced emails from the sent emails. This number should be below 1%. If not, the setting of the Recipients has the Bounce = 0 setting missed out. This should not happen again.
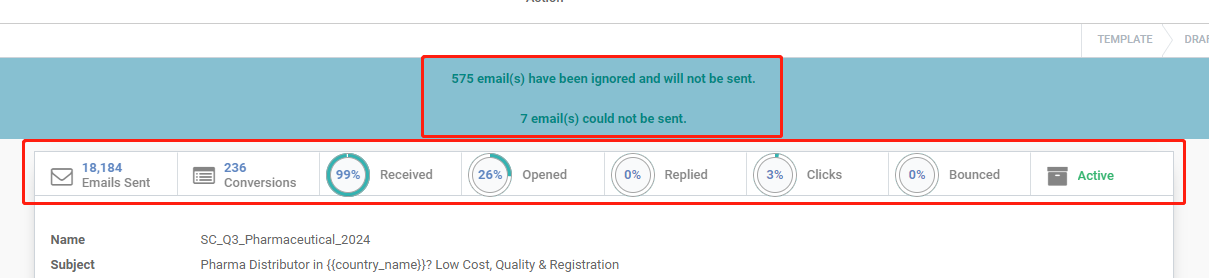
- At this point, the Newsletter task is completed from Campaign Specialist’s side and new Leads from the Newsletter should start coming in for Marketing Dept. and BD Dept. to handle as per usual.
- Confirm over task to the Marketing and BD Dept. Managers that Newsletter has been launched successfully, and moves the stage of the NL Task to “EXECUTION” stage.
- Set an Activity under the Newsletter Task for Launch date + 3 weeks to come back to the Newsletter for the Newsletter Performance Assessment and Reporting which is covered in this SOP: Assessment and Reporting.