Home
Standard Operating Procedures
Sales Dept. - Business Development
SOPs
Confirming a New Registration
Creating Registration Agreement (RA) from SO
Creating Registration Agreement (RA) from SO
| 7 minutesRegistration Agreement (RA) is created when the registration process is started internally. It refers to an agreement between Vendor and AdvaCare (on behalf of a Customer) to start a registration process of a list of products. In the system, Registration Agreement (RA) is also a portal used to keep track of a registration status under this agreement.
This SOP will list the steps on how to create a Registration Agreement (RA) from a Sales Order (SO), consisting of 3 main parts:
Creating a Draft RA from SO
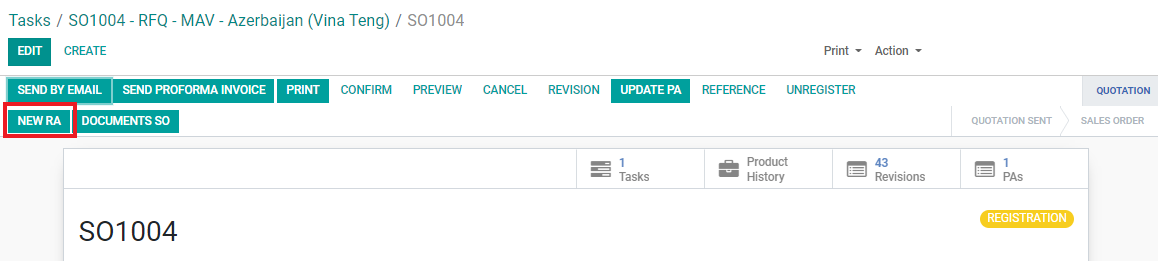
1. Open the Registration SO from which the product list and quotation has been confirmed.
2. Click the “NEW RA” button.
Note: RA cannot be created if SO does not yet have the “REGISTRATION” tag. If the “NEW RA” button cannot be located, first click on the “REGISTRATION” button.
3. A new RA page will be created. Find the following details and fill in the empty fields:
• Assigned to: automatically filled in as RA Dept. Manager.
• Sales Order Reference: automatically links to the SO.
• Salesperson: check and make sure the Salesperson is correct which is pulled from the SO.
• Priority
• Start Date
• Vendor Registration Agreement
• Vendor
• Export Country
• Range
• End Date
• Site Registration
• Authentication: this checkbox will be ticked if there are any documents present under the “Authentication” model of this Country. It is intended as a reminder for BD Salesperson to double check if the information of authentication requirements provided from the Customer match the database in our system. The tick will automatically be removed if documents under this RA - Authentication are all removed.
4. Click on the Start Date field. Choose the date that the Registration Deposit has been received or registration has officially started from the Customer’s perspective (usually payment receipt date).
5. Click on the empty Vendor field, a list of Vendors that are selected in the SO will be available. Click and choose one Vendor from the dropdown.

Note: Do NOT create a Vendor from this field. If Vendor does not exist, revise the SO by selecting the correct Vendor when quoting.
6. Click on the empty Export Country field. Type and select the Country for this registration. It should be the same as Destination Country of the SO.
Note: Do NOT create a Country from this field. If Country does not exist, ask BD Dept. Manager to add the country.
7. Click on the empty Range field. The range includes the different product ranges. Type and choose the range that reflects the products under the SO from the dropdown. Choose ONLY from the following:
• Type: Medical Device
• Type: Pharmaceutical
• Type: Supplement
• Type: Veterinary
• Type: Pet Supplement
8. Optional: if this registration is intended ONLY for SITE REGISTRATION, tick the
Site Registration checkbox. For site registration, skip the next step No. 9.
9. After the Vendor, Export Country, and Range fields are filled, move to the tabs on the bottom half part of the screen. Under the “Products” tab, click “Generate Products”. The products quoted under this SO from this Vendor will be listed in the table below.
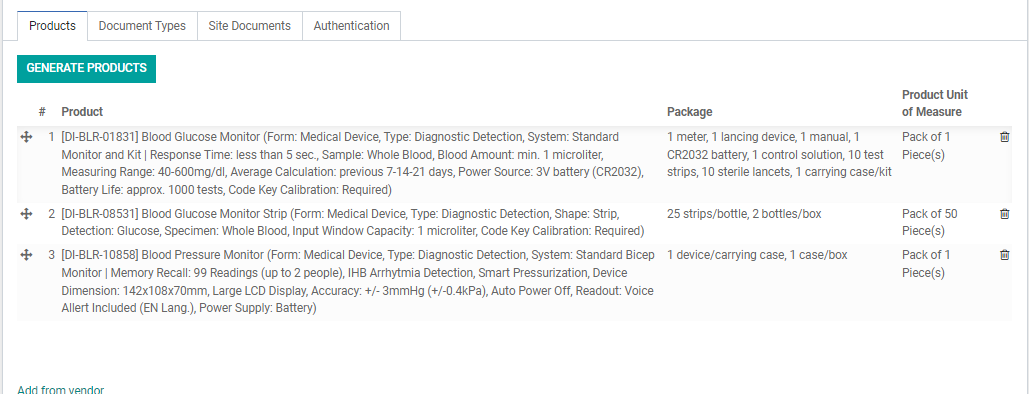
Note: You can remove products from the RA if required in case some quoted products are yet to be confirmed. When there are additional products in the SO, you can click again “Generate Products” and it will not affect the existing generated Product Registrations. Do NOT use the “Add from Vendor” button to add products, do it from the SO and click again “Generate Products”.
10. Click on the next tab “Document Types”. And click the “Load from Country” button. The table will be automatically filled in with the registration requirements of the Registration Country + Product Range from the database. Each Customer may have some minor difference in the registration requirements, edit the list according to the Customer’s registration requirements.
• Remove documents that are not required by clicking on the trash “🗑” button.
• You can also add documents that are not in the list by clicking the “Add a line” button in the bottom of the list and typing and selecting the Document Name required.
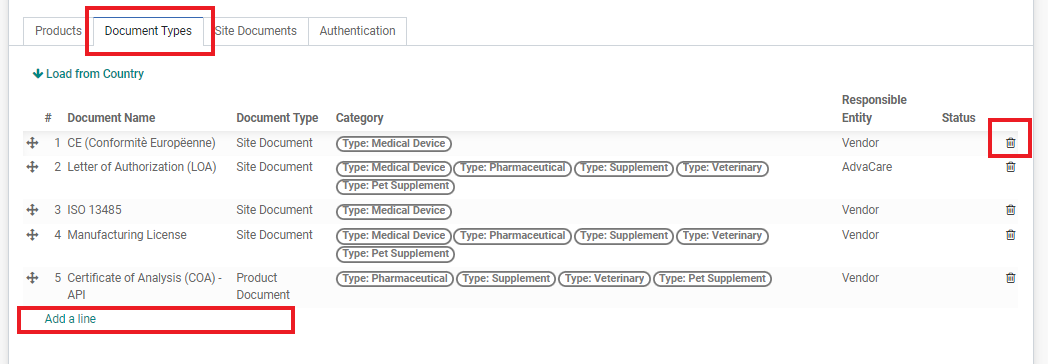
Note: Make sure that the document list is perfectly accurate with the Customer requirements. Additionally, always include “JV Declaration Agreement” and “Samples” (if samples are required) even though it is not a Customer requirement or considered as a document. Do NOT create a document from this field. If the Document Name does not exist, ask BD Dept. Manager to add the document.
11. Once the document list is final, move over to the tab “Authentication”. The table will also be pre-filled from the Registration Country database. Edit as required:
• Remove authentication that are not required by clicking on the trash “🗑” button. The Authentication checkbox on the top of the page will be unticked if all authentications are removed.
• You can also add authentication that is not in the list by clicking the “Add a line” button in the bottom of the list and typing the document name and selecting the Authentication required.
Note: Do NOT create an authentication from this field. If the Authentication Type / Document Name does not exist, ask BD Dept. Manager to add it.
12. Click “SAVE”.
13. Use the breadcrumbs to return to the SO and repeat the steps as needed from No. 1 if there are more than 1 Vendors for this Registration SO.
Validating the RA(s)
1. Once all RA(s) have been created for all vendors under one registration SO, return to the Registration Project/Task.
2. Send a task to BD Dept. Manager to validate the RA(s) under the SO Task.
3. Once validated, the status of the RA will move from “Draft” to “In Progress”. BD Dept. Manager will also assign an RA Specialist when validating the RA.
4. BD Salesperson then sends a task to:
China Registration
Design Dept.
• Inform Design Dept. to start working on the mockup, provide the packaging requirements in the task (such as Vendor name/address requirement, “Made in China” requirement, etc.)
Purchasing Person
• Inform Purchasing person to handover the communications regarding this registration to the RA Specialist.
• If any samples will be required from Vendors, provide the samples requirements: Sample specification, quantity, and Packaging and inform Purchasing Person to proceed with the dummy PO for the registration samples.
• For any payments needed to be made to the Vendor (documents/samples), also inform the Purchasing Dept. to set the Registration Milestone REG: 4. Payments to Manufacturers Completed.
RA Specialist
• Inform RA Specialist to be briefed and take over communications with Vendor(s) from the Purchasing Person.
• Proceed with signing Vendor Registration Agreement (VRA) with Vendors and to set the Registration Milestone REG: 5. Documents Preparation Started/Vendor Registration Agreement Signed.
• Start handling the RA and working on the registration documents.
• Inform them of any documents that will NOT be obtained from the Vendors in the requirement list, for example during the discussion of the RFQ, Salesperson has decided that some documents will be received from the Agent/made in-house instead. Inform all these to the RA Specialist.
India Registration
Purchasing Person
• Inform Purchasing person to proceed with signing the Document Preparation/Sample Production Agreement with the Vendors and setting Registration Milestones REG: 4. Payments to Manufacturers Completed and REG: 5. Documents Preparation Started/Vendor Registration Agreement Signed.
• Asking for the PP, Draft COPP, Vendor Packaging Mockup, Insert and if possible pictures of the finished product (tablet pictures, bottle pictures, box pictures etc.) from the Vendors.
• Inform them of any documents that will NOT be obtained from the Vendors in the requirement list, for example during the discussion of the RFQ, Salesperson has decided that some documents will be received from the Agent/made in-house instead. Inform all these to the Purchasing Person.
RA Specialist
• Provide a short summary about the registration status and what documents will be provided from the Vendor vs. obtained from Agent/made in-house. Also ask RA Specialists to start handling the RA and continue to follow up with the Purchasing Person on the registration documents.
Design Dept.
• Once all information from bullet point II above has been received from India Purchasing person, inform Design Dept. to start working on the packaging mockup
More information on Handling Packaging Process can be found in the next SOP level.
BD Salesperson can also set an estimated date for Registration Milestone REG: 6. Customer Confirms Packaging at this point.
Did this article help you?
0
0