In order to have the database of all vendor documents in the System to be able to refer to it for any registration RFQ, Purchasing/Registration Person needs to first create the documents.
This SOP will list the steps of how to create Vendor documents in the System.
Getting started with Documents
There are several types of registration documents that need to be created in the System to be able to track the status of each registration and to know what documents are available in the server, what documents any particular vendor has. This is important for several departments: Business Development, Registration, Purchasing.
The following are the types of Documents that are handled through the System:
Site Documents: any document that belongs to the Vendor and is not related to any specific product. For example, GMP from country of origin or any other country. This type of document is created manually by Registration/Purchasing Dept, and is used to filter and find the suitable vendor for any specific registration.
Product Documents: any document that is related to a specific product. For example, CTD Dossier or COPP. This type of document is generated by the system based on any specific registration requirements.
Registration Certificate: a special type of a product related document which is created manually after receiving the copy of registration certificate after registration is completed.
How to create Site Documents
1. Locate Registration Module.
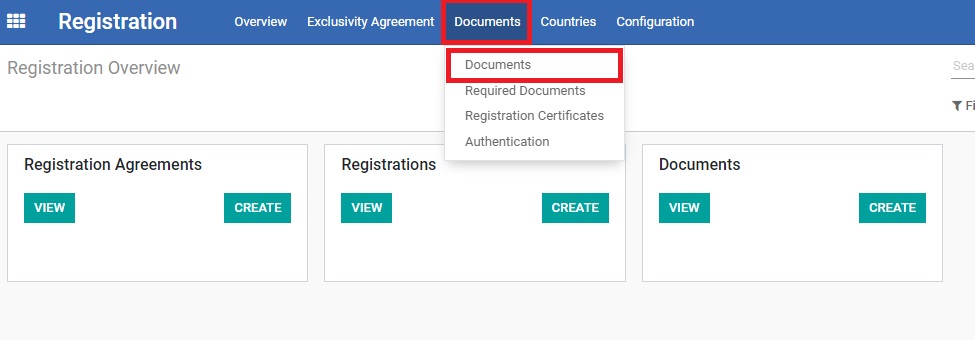
2. Click 'Documents' in the top menu and choose 'Documents' option from the dropdown.
3. Click 'CREATE' on top of the screen.
4. Fill out 'Document Name' field in the new Document form. Start typing the name of the document and choose the right option from the dropdown.
Note: Choose existing document from the dropdown, NEVER create a new document name. All the documents are pre-created. If the required Document Name is not showing in the dropdown, make sure the name of the document you are typing is correct. If it is correct but the document is not showing, ask Business Development Manager to create the required document.
5. Fill out 'Vendor' field. Start typing the name of the Vendor and choose the right option from the dropdown.
Note: Choose existing Vendor from the dropdown, NEVER create a new Vendor. If the required Vendor is not showing in the dropdown, ask Purchasing Dept. Manager to create the Vendor.
6. Fill out ‘Product Range’ field by searching and choosing the correct ranges from the dropdown. Range has to be as detailed as possible. For example, if Vendor has China GMP for tablets/capsules, choose two ranges: “Pharmaceutical / Tablet” and “Pharmaceutical / Capsule”. Every certificate has this information. If Vendor has several GMP certificates for different dosage forms, each certificate has to have a separate Document created in the System.
Note: If there is no certificate copy in the file server, fill out generic product range, for example "Pharmaceutical". However, the Product Range has to be filled out as detailed as possible.
7. Fill out 'Registration Country' field. This field refers to any certificate issued by another country FDA or MOH. For example, if Vendor has GMP from Nigeria, Nigeria has to be filled out in ‘Registration Country’ field.
Note: 'Registration Country' field only applies to other countries, not the country of origin. There is no need to feel out China/India for local GMP.
8. Fill out ‘Issue Date’ field – the date has to be chose according to the issue date of the actual certificate.
Note: If the certificate copy is not available, leave this field blank.
9. Fill out ‘Expiration Date’ – the date of expiration of the actual certificate.
Note: If the certificate copy is not available, leave this field blank.
10. If the actual certificate copy is available in the file server, mark the checkbox 'Received'.
Note: This field is used by Registration/Purchasing Dept. to know which documents are available in the file server, so that Registration/Purchasing Dept. does not have to ask the Vendor to send it again.
11. Click 'SAVE'.
12. Check all the information in the created Site Document. If any changes are required, click 'EDIT' and change the information. If everything is correct, click 'VALIDATE'.
How to check Site Documents of a Vendor
Purchasing Dept. needs to be able to check which Site Documents any given Vendor has, as well as find the Vendor according to documents requirements of any specific registration RFQ.
To check which Site Documents any given Vendor has follow the process below:
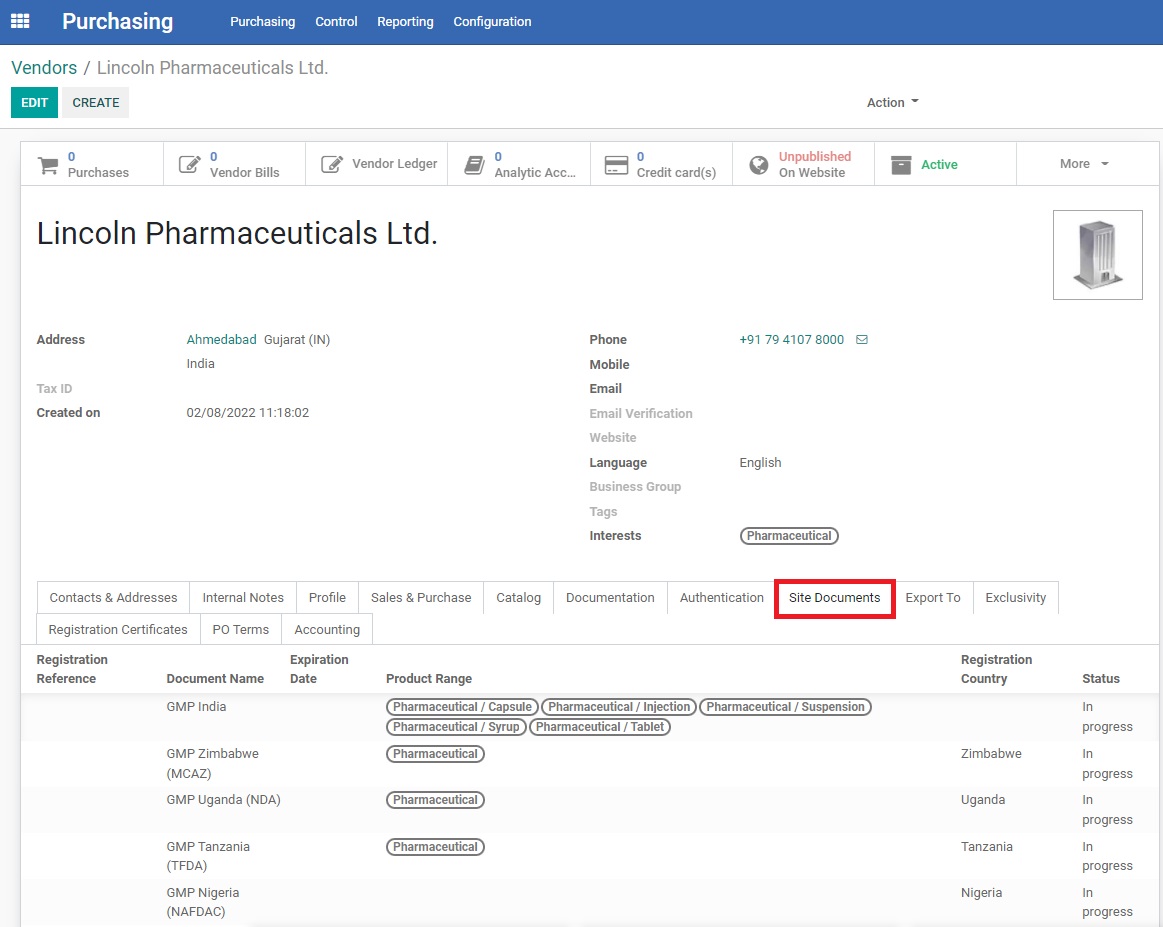
1. Open Purchasing Module, and find 'Vendors' in the top menu 'Purchasing' dropdown.
2. Search the Vendor by the Vendor name.
3. Open 'Site Documents' tab and see all the Site Documents of the Vendor.
4. Evaluate the results.
Note: Site Documents can only be created from Registration Module, cannot be created from Vendor page.
To find a suitable Vendor by the Site Document required follow the process below:
1. Open Registration Module.
2. Open 'Documents' page from 'Documents' dropdown.
3. Type Document name in the Search bar and click Enter.
4. Evaluate the results.
Note: It is also possible to search the documents by Vendor Name, Registration Country, Product (for Product Documents), Customer Code. To search by any of these options, start typing the name and choose the option 'Search by' in the dropdown.