Handling Lead Replies
| 32 minutes|
This SOP will detail how Marketing Person will process Leads for all inbound inquiries that will come in on a daily basis on the CRM Module. Lead Reply process must be followed as accurately as possible, a few Key Performance Indicators (KPIs) of how well the Lead Replies are being handled will be shown in LR Reports. Including the following: Setting Up
Note: all previously processed Leads will be marked as “Read” by the System, unless the processed Lead has again received a reply from the Customer side. This process will be explained in more detail in the next part of the SOP.
Processing Non-Lead EmailsNot all incoming emails shown in the LR Module are Leads. The sales inbox can also receive clutter from spams, promotional emails, system emails, or potential factories trying to reach out to AdvaCare as a pitch. If Marketing Person can skim read and quickly identify these emails from the Lead title in the Leads overview, process it quickly to get it out of the way before the main LR process.
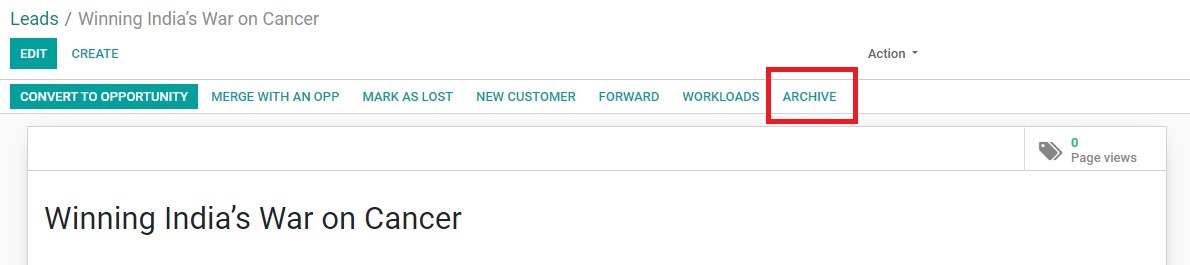
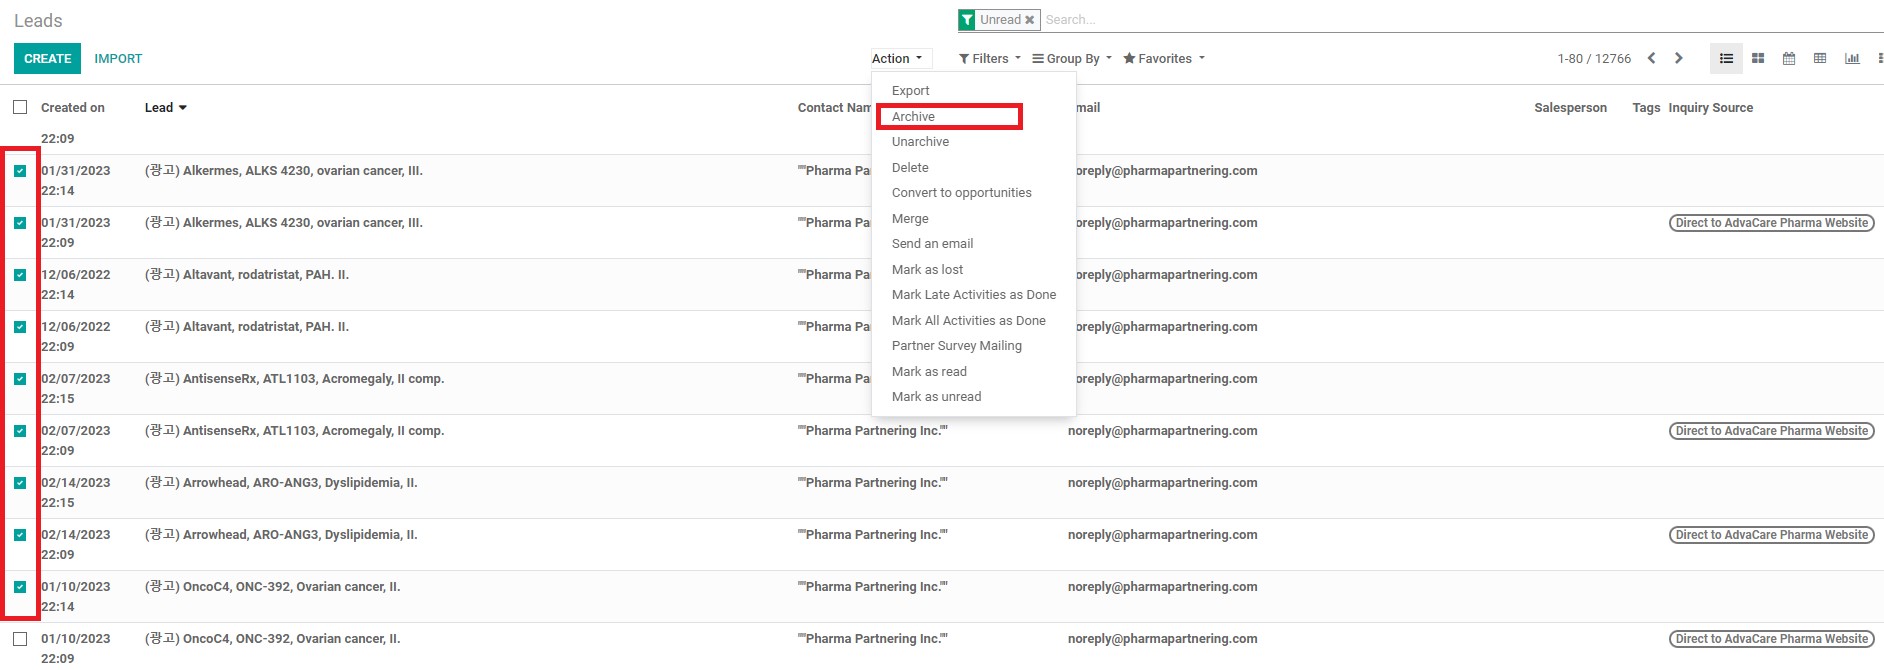
Marketing Person can also archive multiple emails at the same time, by selecting multiple leads from the Leads Overview page, and clicking on the “Archive” button from the dropdown.
For inquiries from manufacturers that are pitching products related to AdvaCare product range, the information is to be forwarded to Procurement Dept. as it is a useful resource.
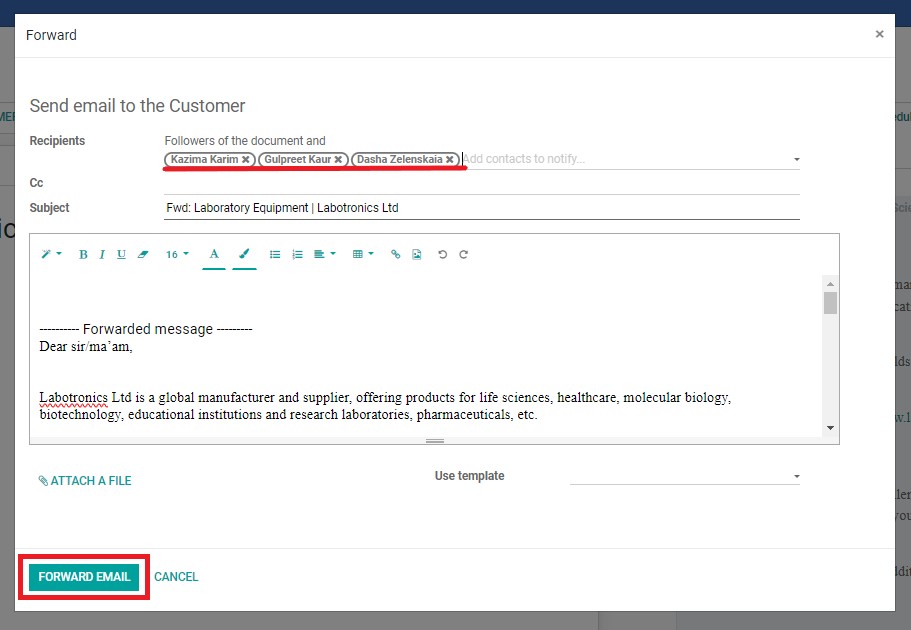
Recipients: Procurement Dept. Manager: dasha.zelenskaia@advacarepharma.com India Purchasing Specialists: kazima.karim@advacarepharma.com arsheen.shaikh@advacarepharma.com Recipients: Procurement Dept. Manager: dasha.zelenskaia@advacarepharma.com China Purchasing Specialists: teresa.zhang@advacarepharma.com, ivy.bao@advacarepharma.com daisy.zhou@advacarepharma.com
Note: make sure to
select the correct contact persons
from the dropdown.
Do NOT create a new contact person
.
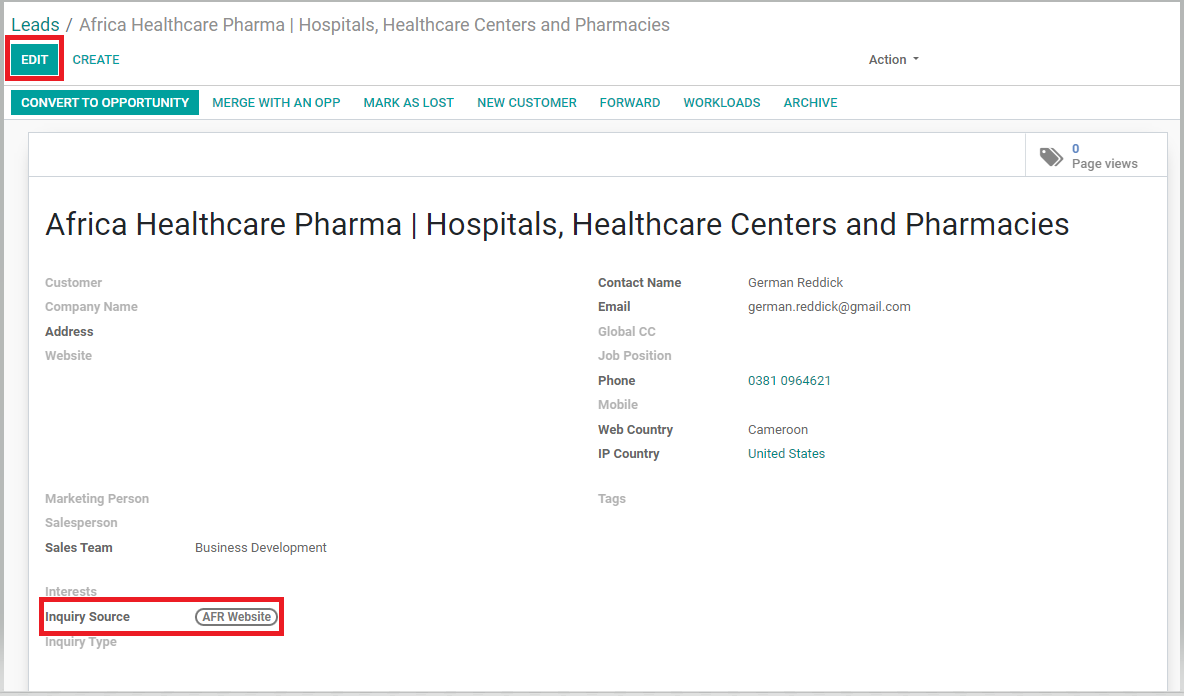
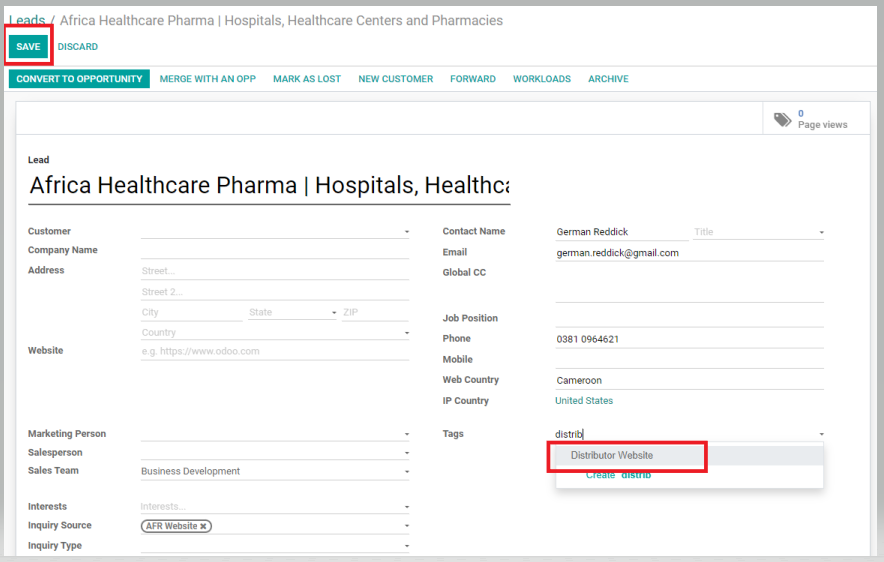
Emails that are directed to Advacare’s distributors website. These emails cannot be considered as Leads, and are only redirected to sales@ for performance review of the websites. These emails will be automatically labeled as the following as “Inquiry Source”: Marketing Person only needs to “Read” and tag these emails.
Processing New Leads (Customer Card Not Existing)Once ready to start with going through each Lead, Marketing Person can see immediately from each Lead page whether the sender is already in the System or not by looking at the Customer field. This part of the SOP explains how to process New Leads, meaning those which no Customer Contact Card has been created yet, and this inquiry is likely the Customer’s first contact. When a new inquiry is received from an email address that is not in the System, there may be a possibility that somehow the Contact Person has prior communications with the Company, but for some reason was not added in the Contacts Module yet. Before processing the Lead, Marketing Dept. can double check whether or not prior contact has been made with the contact person, from the following workspaces:
Note: during the migration period to the new LR Module, many Leads may be newly created in the System although it was actually a reply to a pre-qualification email already. In this case, skip this part of the SOP and go down to the Processing Customer’s Reply to Auto-Replies part.
Note: Be careful to
NOT
open a new incoming email on sales@ inbox before the Lead shows up on the LR Module. This may cause the inquiry to not show up as a Lead on the LR Module. If this happens, proceed to Troubleshooting Mistakes/Bugs on the LR Module SOP.
For example:
PersonA@companyAB.com and PersonB@companyAB.com has sent separate inquiries. For us, we are working under one agreement with Company AB, even if the product list or nature of the inquiry is different. Both emails must be saved as Individual Contact Cards, under the Company Contact Card - Company AB.
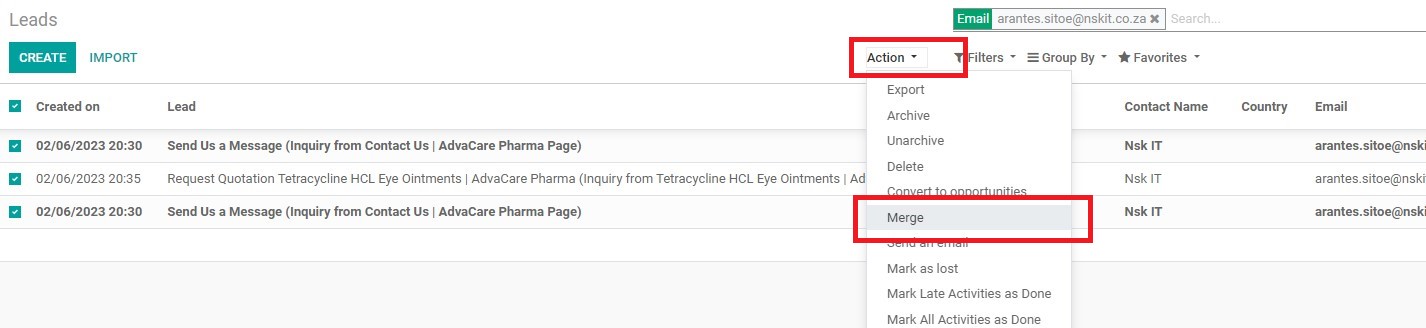
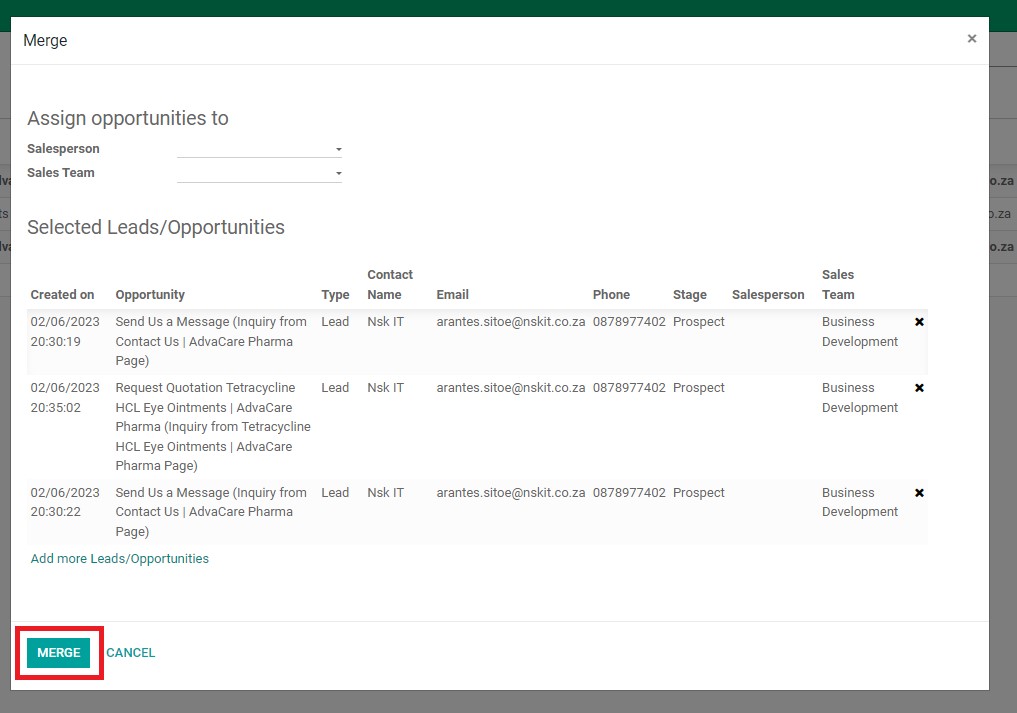
Regardless of the number of inquiries, this company’s inquiries must all be assigned only to one Salesperson under 1 Company Contact Card. Before processing any Leads, check to see whether more than one inquiry has been sent by a client. Often, Potential Customer may send multiple emails or inquiries on the website. For Leads that do NOT yet have a Contact Card (new Leads with empty “Customer” field), Marketing Person should check first whether more than one Lead has been sent, and if so merge these Lead to be processed as one altogether.
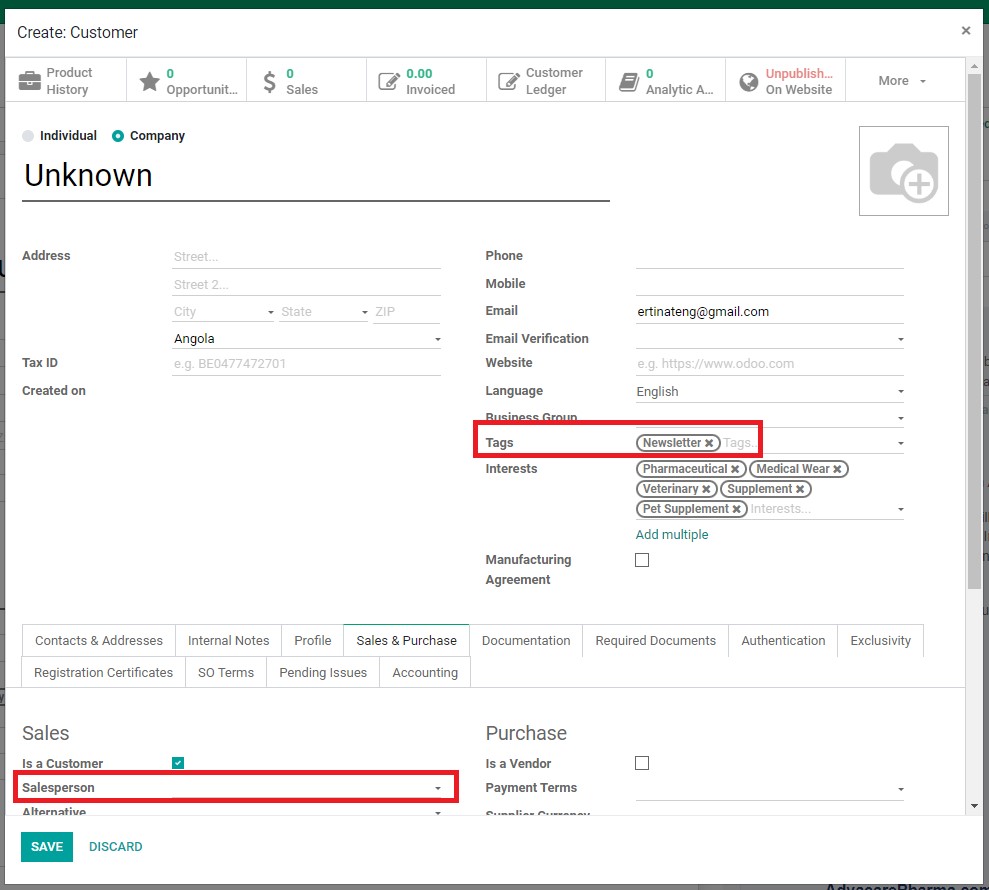
After making sure that a Lead is indeed a new contact and multiple Leads have been merged into one, the Lead can now be processed accordingly. Marketing Person will read carefully the inquiry sent by the client to determine the type of lead and process it accordingly. Main Lead that has been vetted and deemed as a quality Lead based on its inquiry, and to be assigned immediately to a BD Salesperson. Every field that can be filled in the Contact Card MUST be filled in, if the information is available from the Lead.
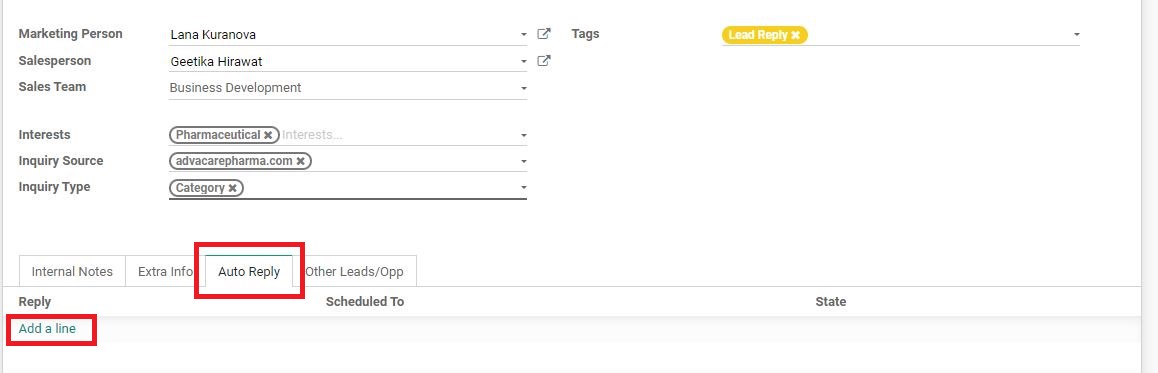
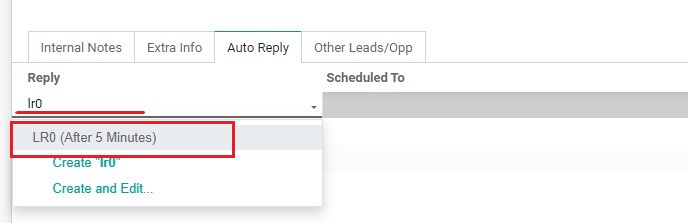
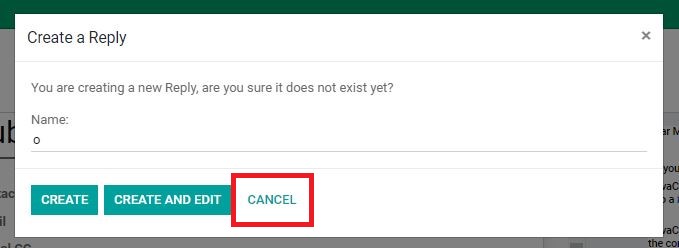
Note: Do NOT create a new auto-reply. If accidentally the selection is not done, the System may recognize it as a prompt to create a new auto-reply and shows a pop-up. In this case, click on “CANCEL” and reselect correctly.
Lead in which inquiry does not yet pass the minimum standard to be treated as a Potential Customer, and therefore cannot yet be assigned to BD Salesperson. The Leads need to go through a pre-qualification process to get more information before Marketing Person can further assess whether they can be assigned to BD Salesperson. More detailed information and examples regarding how to identify each Lead Type can be found here: More information and examples on each type of Lead can be found here: Z:\Shared drives\AdvaCare Marketing Control\Lead Replies\LR Automation → Types of Leads
New Lead that does not have a specific inquiry for any AdvaCare products, rather just an interest in getting Newsletter updates from AdvaCare. This Lead needs to be added to the Contact Card, although no Salesperson needs to be assigned at the moment.
Note: For Newsletter Subscription Leads from Blacklisted Countries, skip the following steps No. 1-4 and proceed with editing the Lead page and inputting from step No. 5. This does not apply for Restricted Countries, process Restricted Countries as per normal.
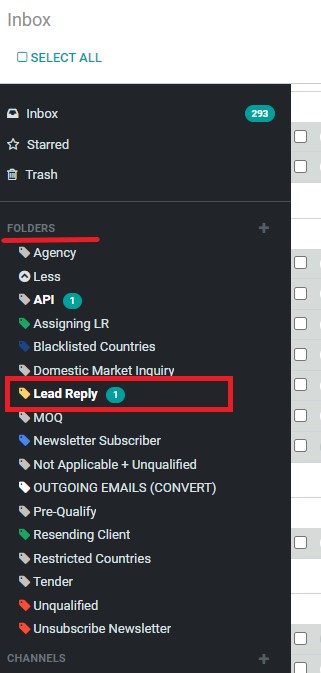
Processing New Customer’s Reply to Auto-RepliesAt the beginning of the daily Handling LR process, Marketing Person wants to first prioritize processing replies from the Customers to Auto-Replies. Open the “Discuss” Module and locate the “FOLDERS” section. Go through each of the folders with notification icons, starting with the “Lead Reply” folder.
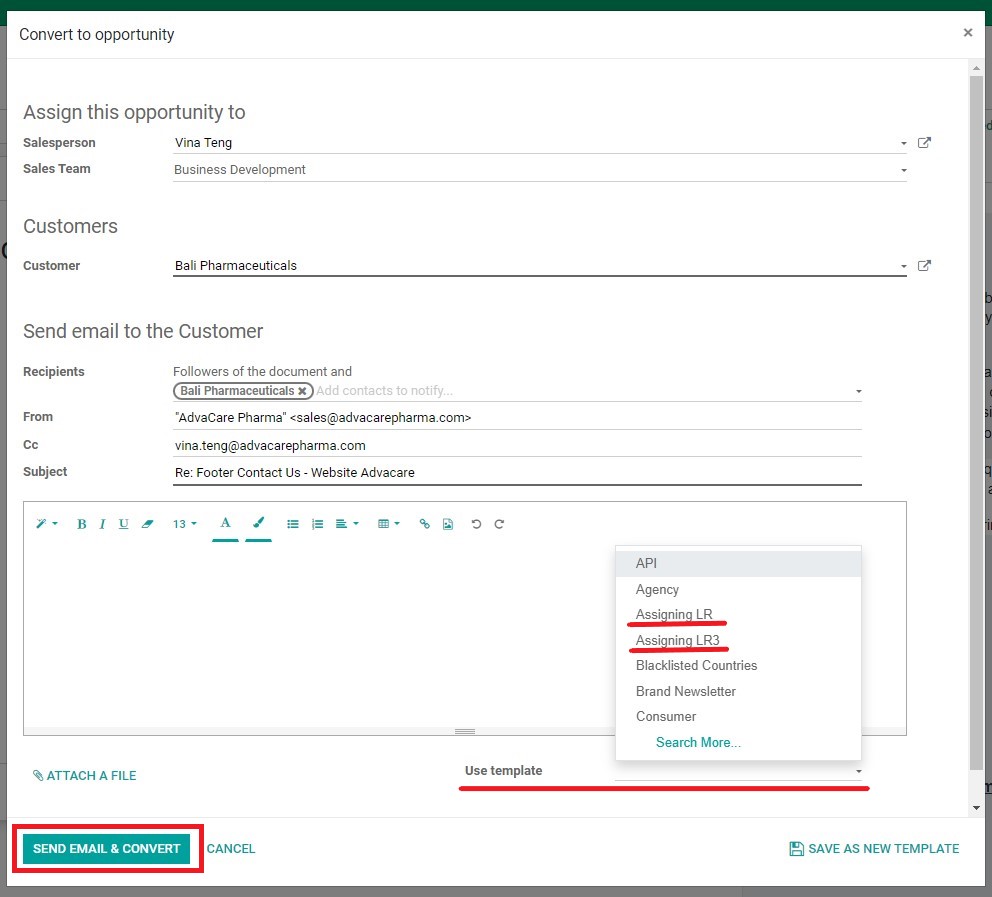
Process accordingly to the tags based on the following order of priority:
Note: the “Assign LR” template has more or less the same content, but with different displayed sender, which is Henry Mitchell for the first one and BD Dept. Manager for the second.
Note: make sure that BD Salesperson is in the “Cc” field.
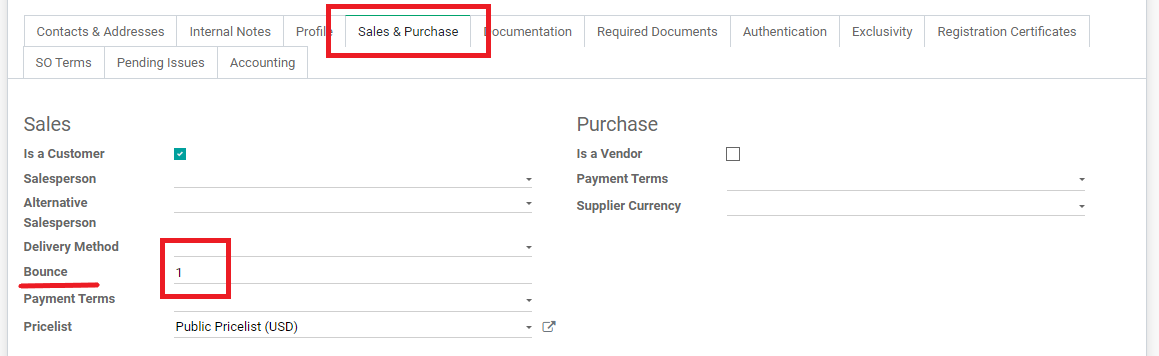
The standard rule of qualifying these Leads are as follows, if still unsure, Marketing Person can consult Marketing Dept./BD Dept. Manager. Triggers to “Qualify” If somehow a Sender has replied to the Newsletter Subscription auto-reply, Marketing Person can read the contents of the reply and ignore it if it is a non-substantial email. If the email represent a serious and legitimate inquiry from the Customer, Marketing Person can escalate the Lead as follows: When a auto-reply is sent out to an email that does not exist, has typos, or have problems receiving emails for the time being, the System will recognize that the email was not sent out successfully and sends a notification to Marketing Person under the folder tag of the Lead and in the chatter log of the Lead.
This can happen to any Leads with any Tags. Follow these steps when it happens: Bad email: customercompanyname@gmal.com The correct email can be inferred as: customercompanyname@gmail.com
After all replies to Auto-replies have been handled and cleaned out from the Inbox - Folders, Marketing Person can clean out (delete) any other irrelevant notifications from the LR Module from their ERP Inbox if it exists. Including the following examples:
Note: Pay close attention to Inbox notifications that are labeled “External” that were not processed earlier in the FOLDERS, in case there are emails incoming from a Lead through the System that somehow skips the Folders. If this happens, inform Marketing Dept. Manager.
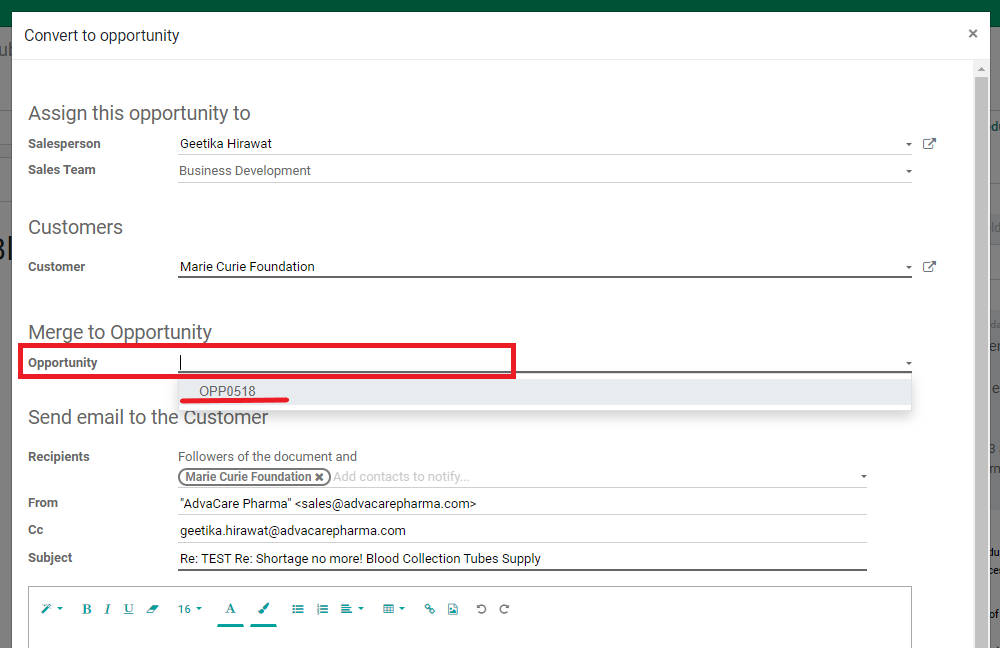
Processing Resending Client LeadsNew Leads can be created even from Customer’s already in the System that has prior communications with AdvaCare. This can happen when the Customer sends a new thread of email, new website inquiries, or replies to newsletters. These Leads are referred to as Resending Clients. In the daily process, Marketing Person can immediately recognize these Resending Clients when a new Lead is opened showing that the Customer field is not empty. Follow this process to handle Resending Client inquiries. Before proceeding with the Resending Client process below, firstly check the email to make sure that they are indeed a new Lead from the Prospect, not other accidentally created “Leads”. Some examples of these Non-Lead emails are as follows, as well as how to proceed them: Non Lead EmailsNon Lead emails that involves existing Customers may include: When sending out newsletters or other campaign emails in general, the recipient of the emails who are already in our database, may have set an automated reply in place for emails such as “Out of office”, “Happy Holidays”, or “Email address no longer valid”. Proceed to “ARCHIVE” these Leads. If a Salesperson accidentally CC/BCC sales@ or info@ emails and Marketing Person can confirm that the email was intended for the Customer, check and do the following: Resending Client ProcessFirstly, check to make sure when the Inquiry was re-sent. It is possible that a Customer comes back within a day or two of our response to their inquiry, that they have missed. To check when the last LR was processed for this customer:
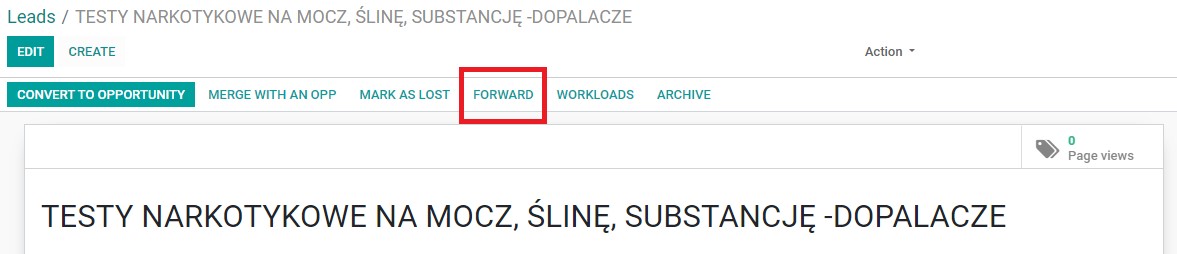
Note: If Marketing Person recognizes that the new Lead is created only within 7 days of previous “Assigning LR” or “Resending Client” process, it may be due to the Customer not being able to see BD Salesperson’s contact yet and already sending new inquiries. In this case, Marketing Person can proceed to just “FORWARD ” the email(s) to BD Salesperson and tag the Lead as “Forwarded - BD ”.
Note: if there is a notification at the top of the Lead page that says “This email address belongs to a Vendor”, it means that the Contact card was created as a “Vendor” and NOT a Customer. Do NOT process this Lead as a Resending Client, rather process as per the above “Potential Factory Emails” process.
Note: If a new inquiry is re-sent by a Lead, even though Marketing Dept. has sent an auto-reply prior that the Lead never replied to, there is a possibility that the first auto-reply has gone to the Lead’s spam folder. To mitigate this, send another auto reply if this new inquiry is received 1 month after the previous one.
Note: at the moment, many Customers are assigned to Geetika Hirawat incorrectly leading to Geetika being assigned in the System to Customers that had no prior communications with her.
If the Assigned Salesperson is Geetika, confirm whether prior communications existed in Geetika’s gmail inbox by searching with the Customer email
. If there is prior communications, proceed with the SOP. If none, proceed to reassign this Customer from the Contact Card - 50/50 between Joseph and Geetika (remains) before proceeding.
Note: If the Customer field is filled in with an Individual contact, rather than the main Company contact, copy the individual contact email and paste on the “Global CC” field. Click on the Customer field and replace the field with the Company contact card instead.
Note: it is mentioned “email(s)” as a new Lead from the same company can be received from different individual contact persons in that company at the same time. This can be seen from the “Other Leads/Opp” tab.
Note: If the Customer field is filled in with an Individual contact, rather than the main Company contact, copy the individual contact email and paste on the “Global CC ” field. Click on the Customer field and replace the field with the Company contact card instead.
Note: If the Customer field is filled in with an Individual contact, rather than the main Company contact, copy the individual contact email and paste on the “Global CC” field. Click on the Customer field and replace the field with the Company contact card instead.
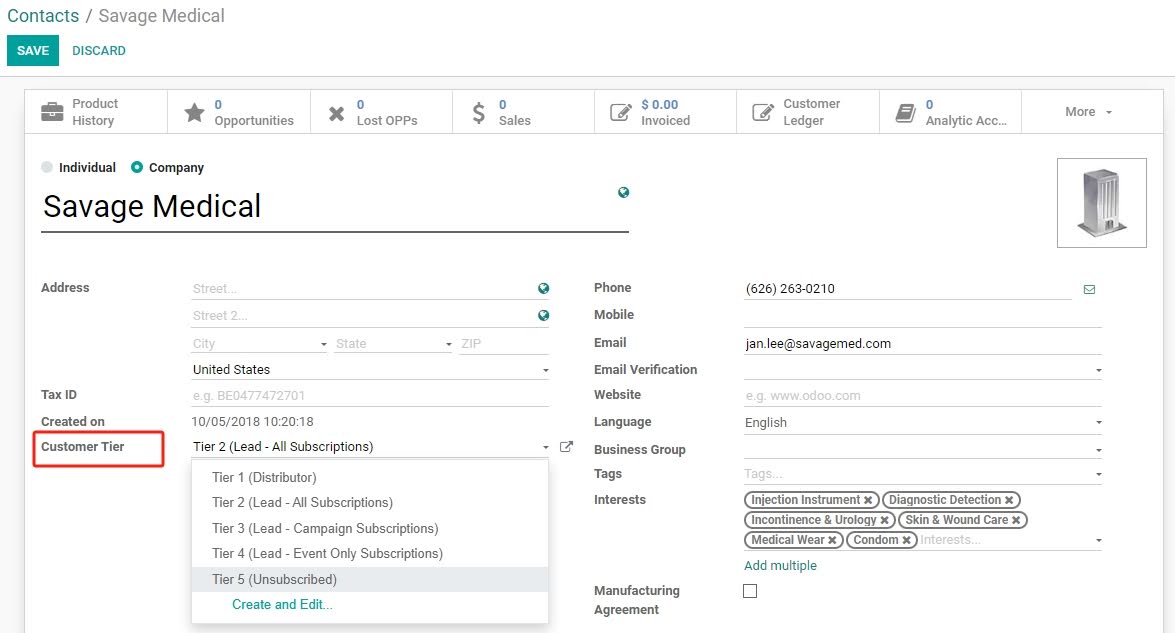
Processing Unsubscription RequestNo reply is required for Customers requesting to unsubscribe to the Newsletter, but the Contact Card needs to be updated to stop the Customer from receiving further newsletter.
Note: most Contacts will fall under Customer Tier 2 (Lead - All Subscriptions), however some Contacts may have an empty field for whatever reason.
|